#
How To Use
You can use Marker Toolbox as either a standalone application (useful if you're exporting to DaVinci Resolve or Avid Media Composer) or as a Workflow Extension in Apple's Final Cut Pro.
#
Workflow Extension
Once installed you can access Marker Toolbox from the Workflow Extension button in Final Cut Pro:
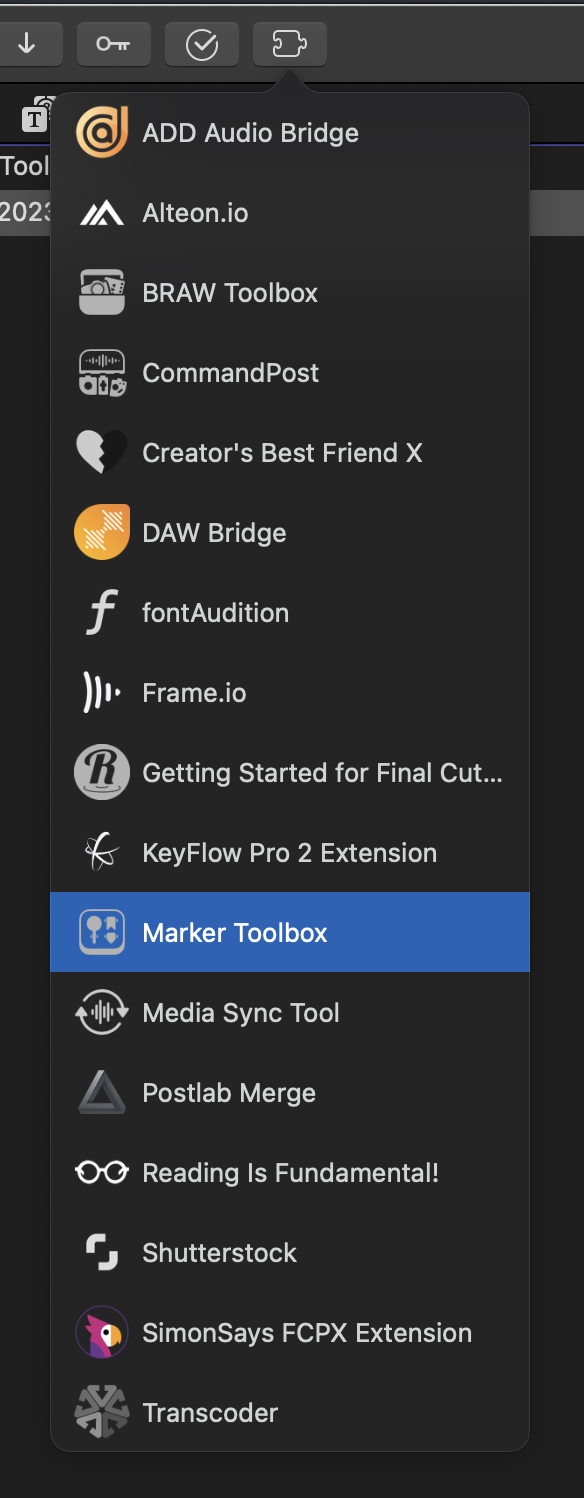
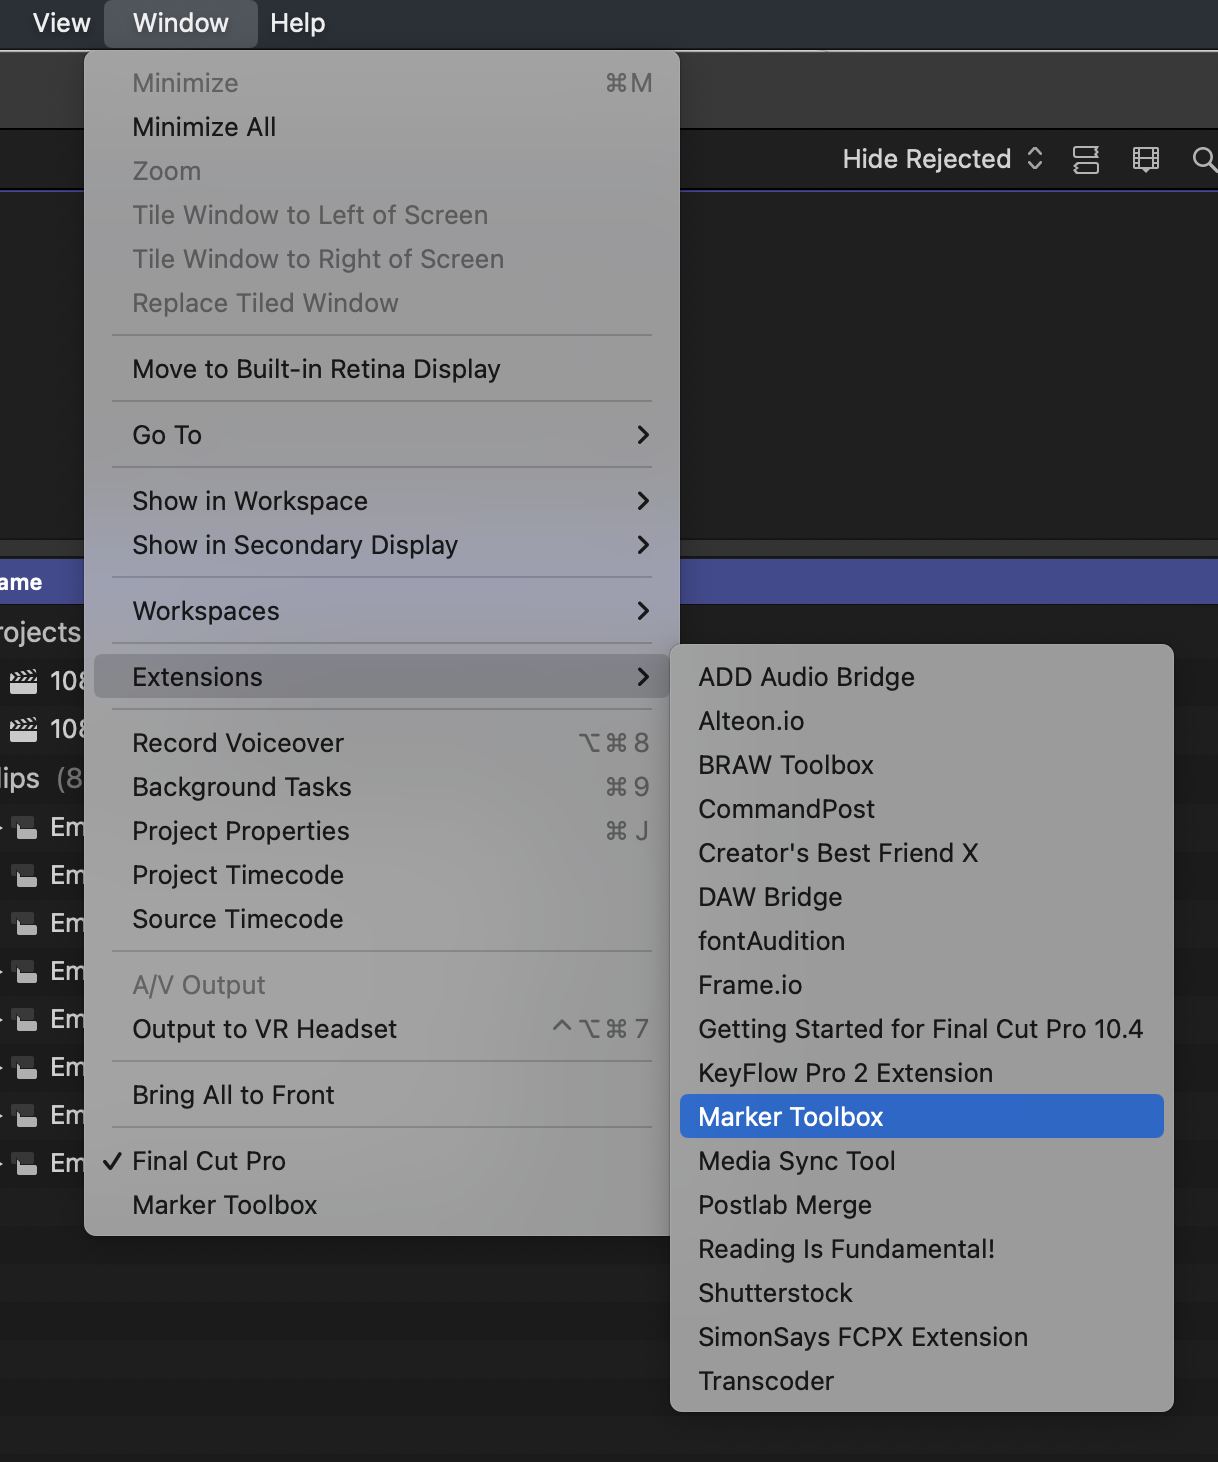
...or via the Window > Extensions menubar:
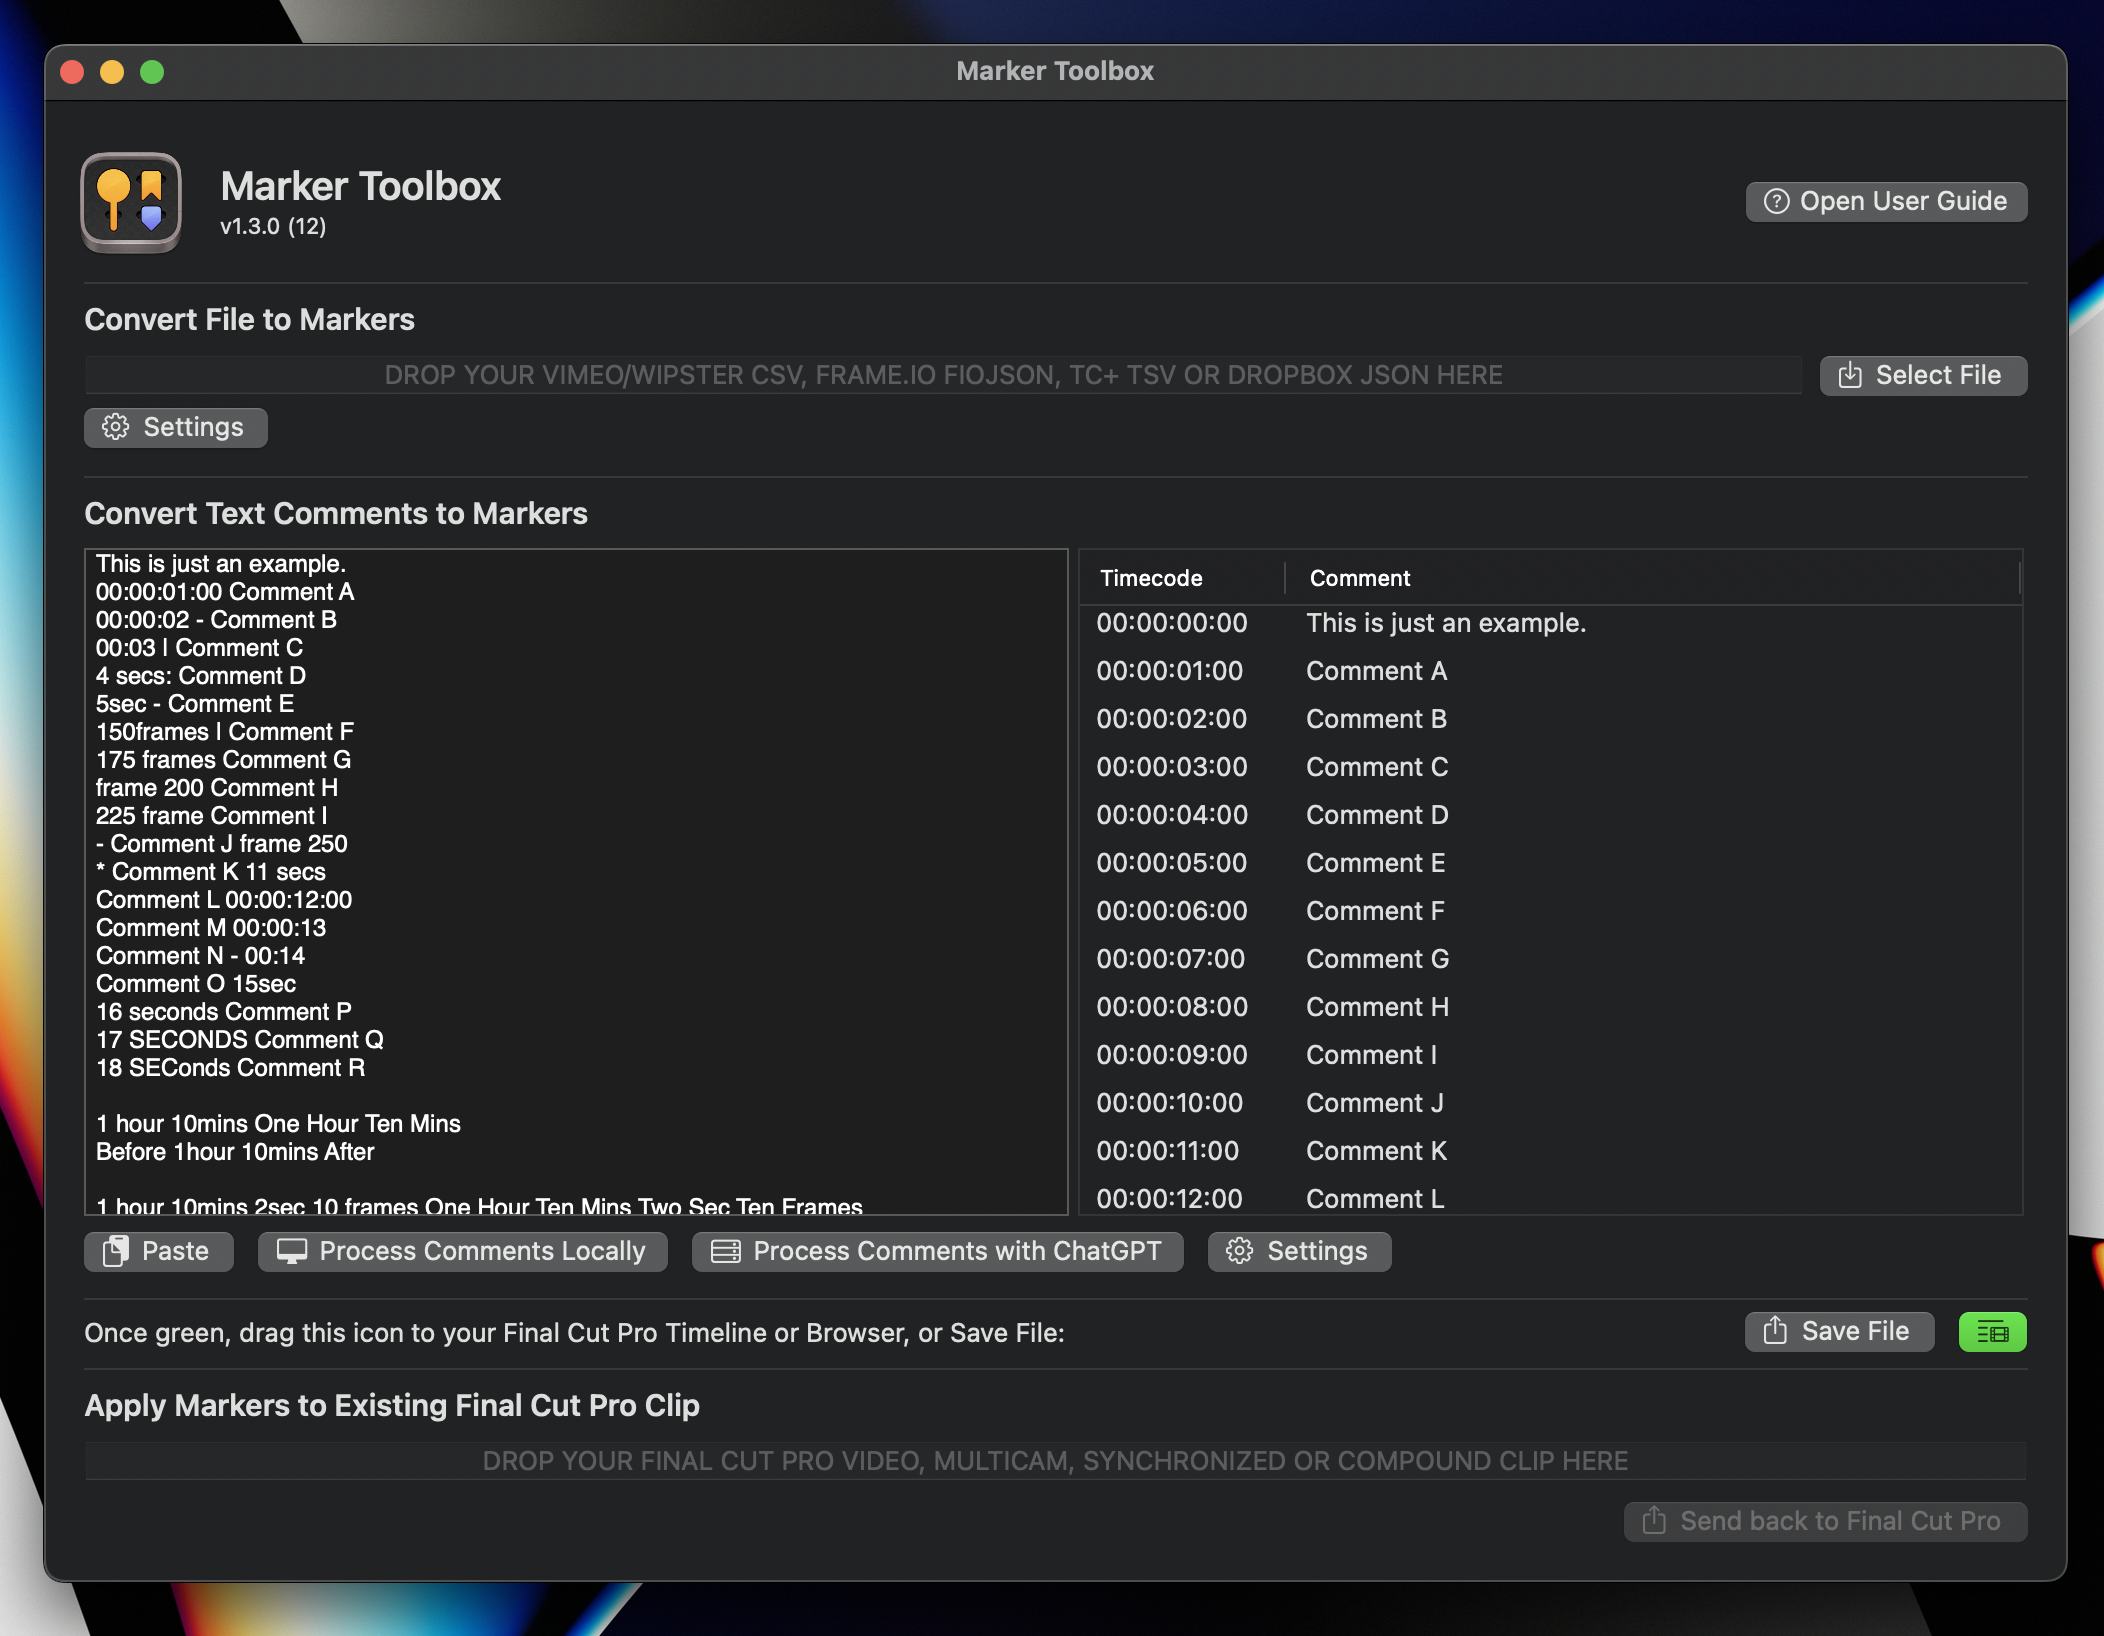
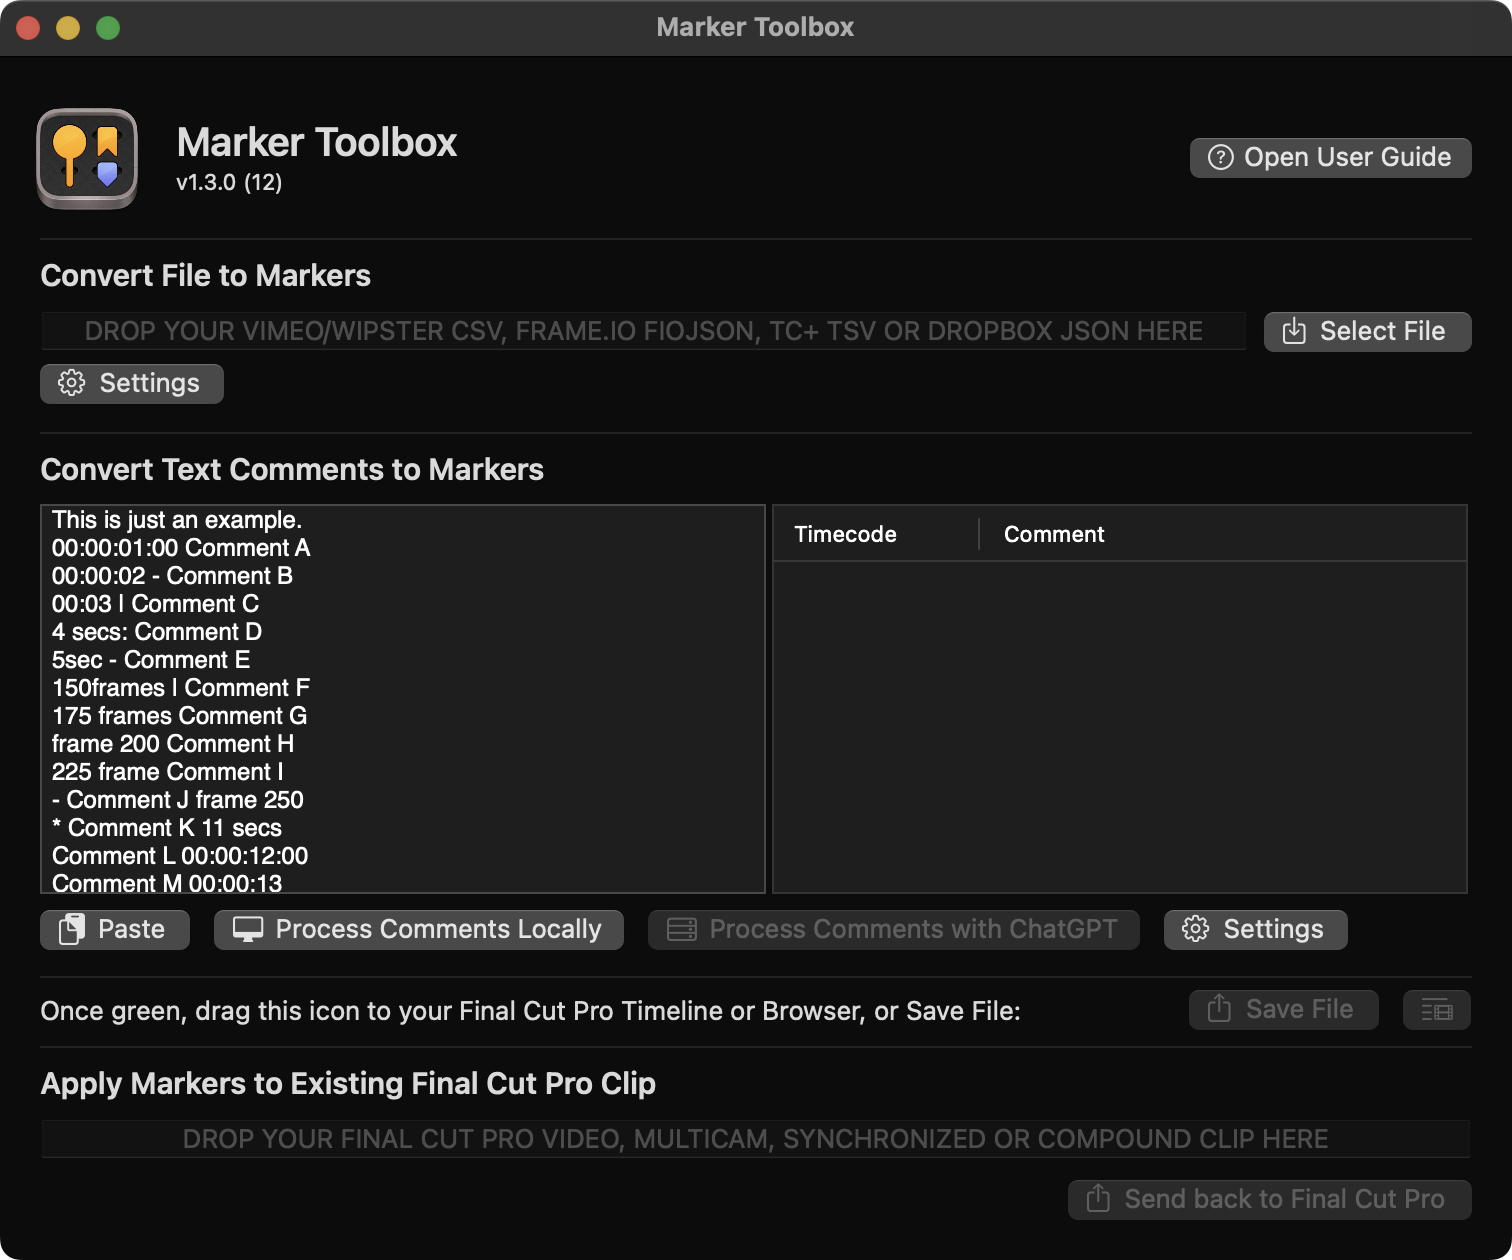
The first time you launch Marker Toolbox it will look like this:
#
Convert Dropbox Replay JSON to Markers
This feature allows you to easily import Dropbox Replay JSON files as markers and titles in Final Cut Pro.
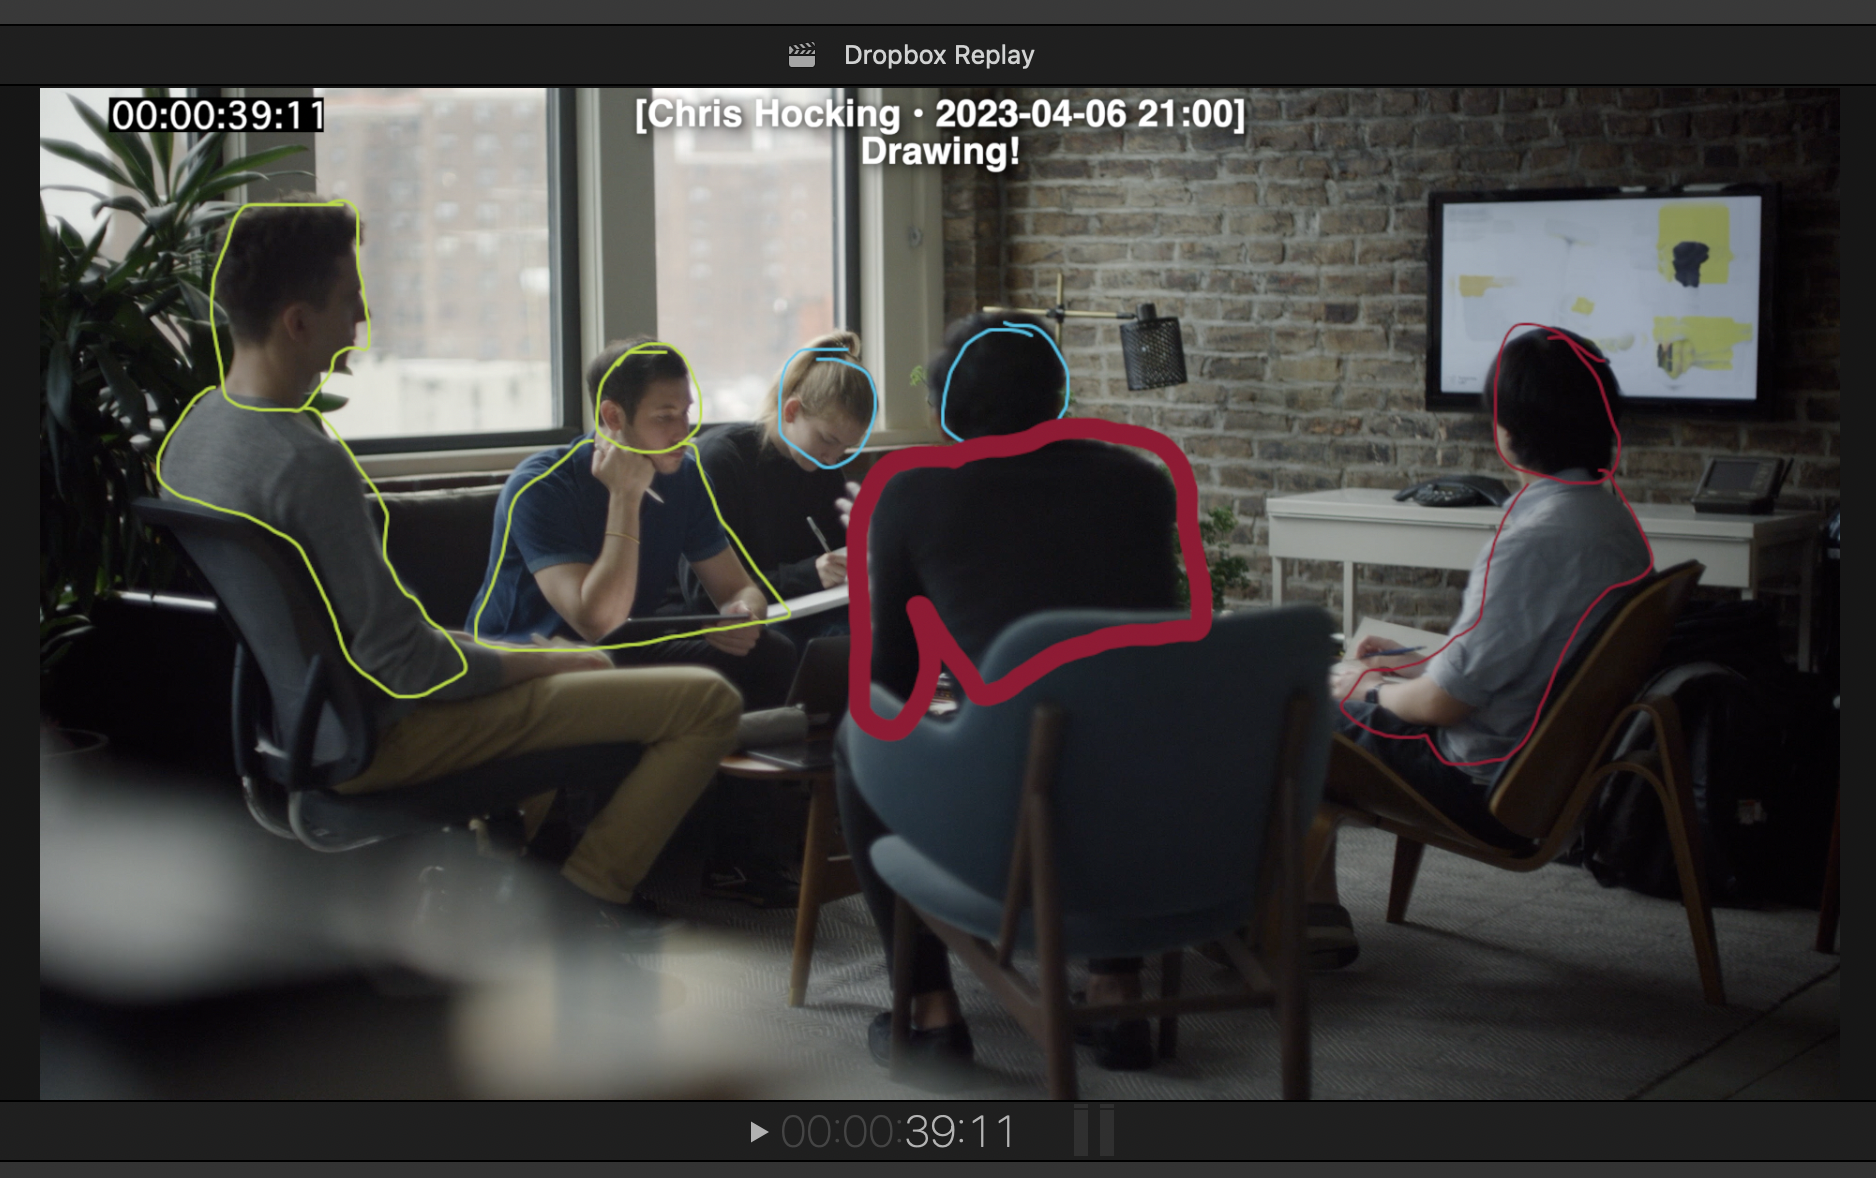
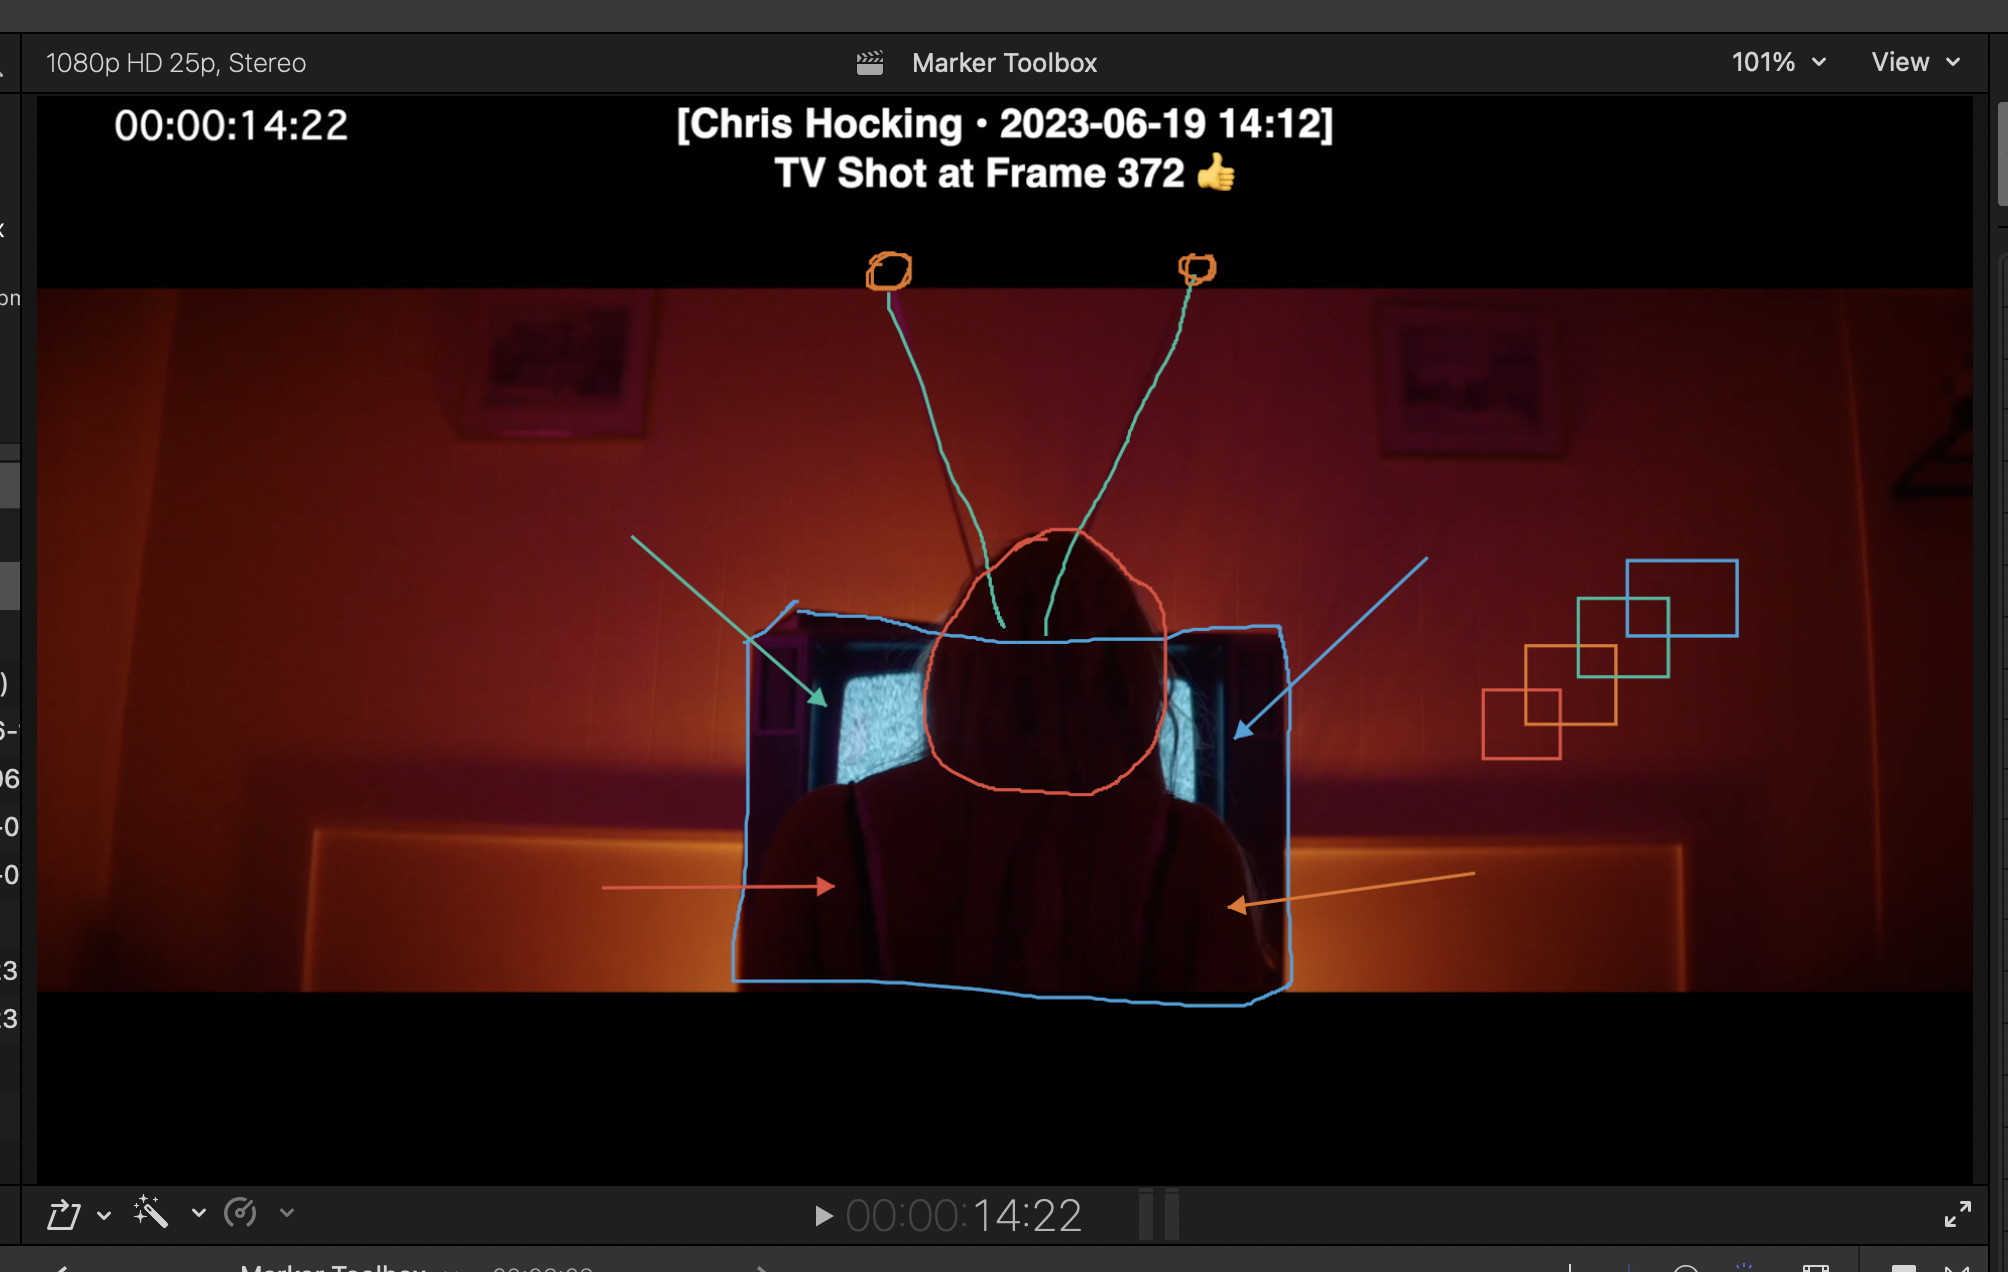
Drawn annotations in Dropbox Replay also come across to Final Cut Pro:
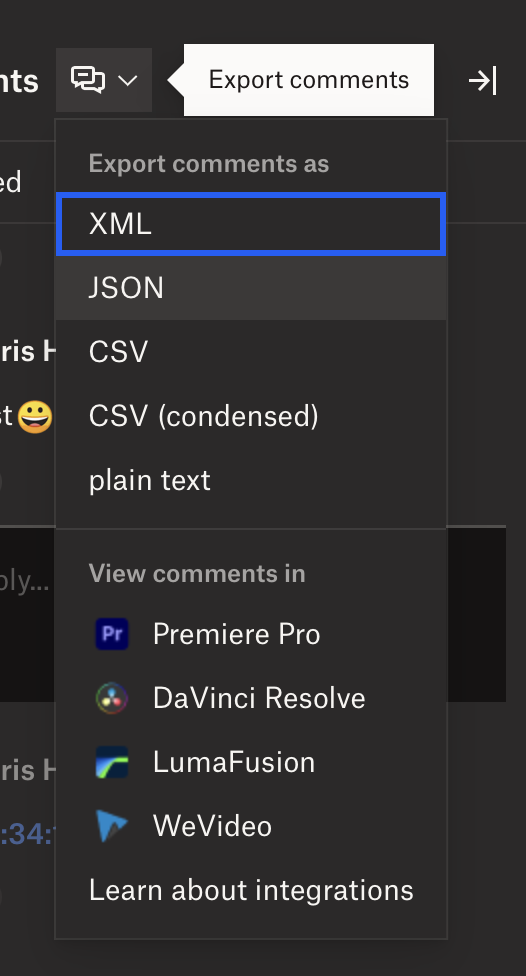
You can export a Dropbox Replay JSON file by clicking the Export Comments button, then selecting JSON:
Once exported, simply drag the JSON file into the drop zone, or click the Select File button:

Assuming the JSON is correct and valid, the draggable icon on the bottom of the interface will now be green:

You can now drag this green icon into your Final Cut Pro timeline or browser.
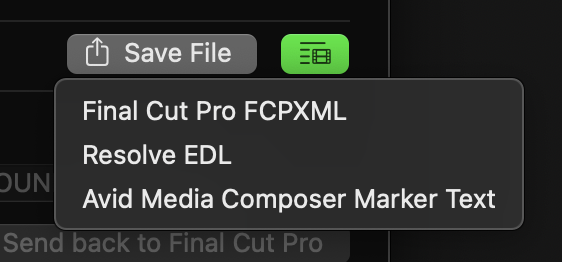
Alternatively, you can also click the Save File button, and export a:
- Final Cut Pro
FCPXML - Resolve
EDL - Avid Media Composer Marker Text.
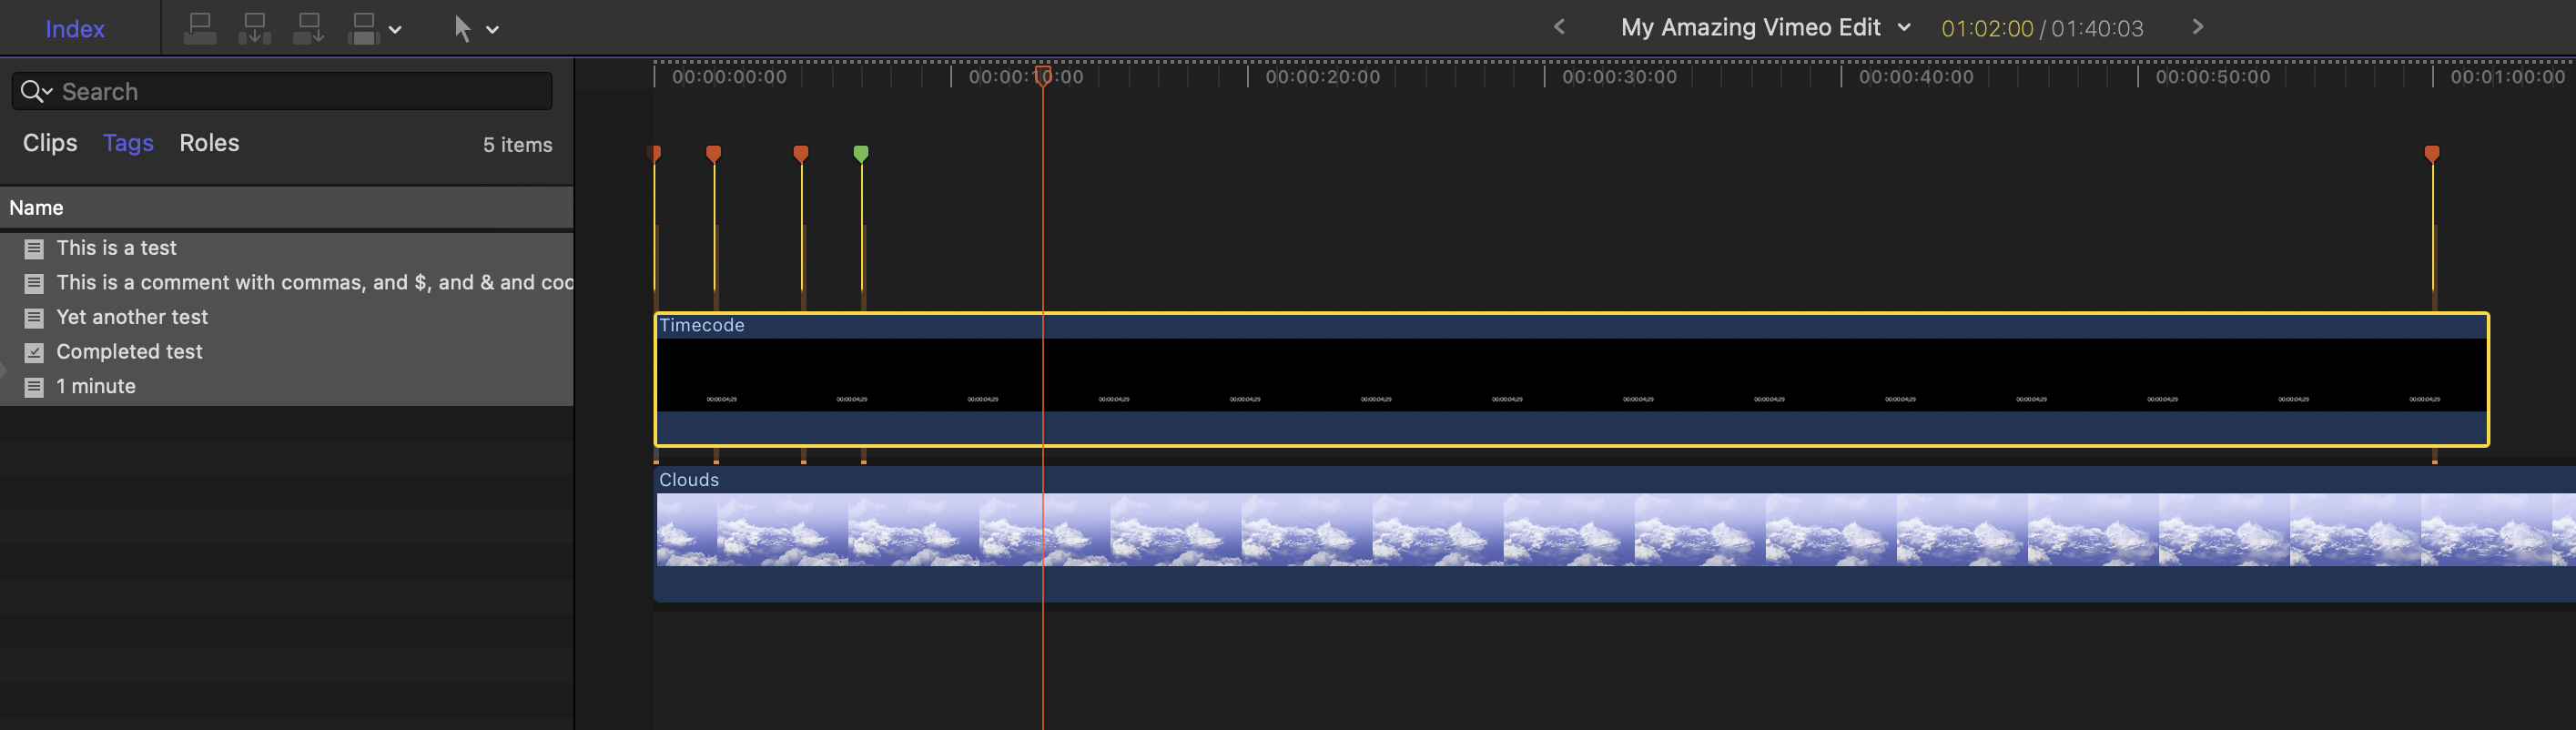
If you drag the icon to your timeline, a Compound Clip with all your markers will be added:
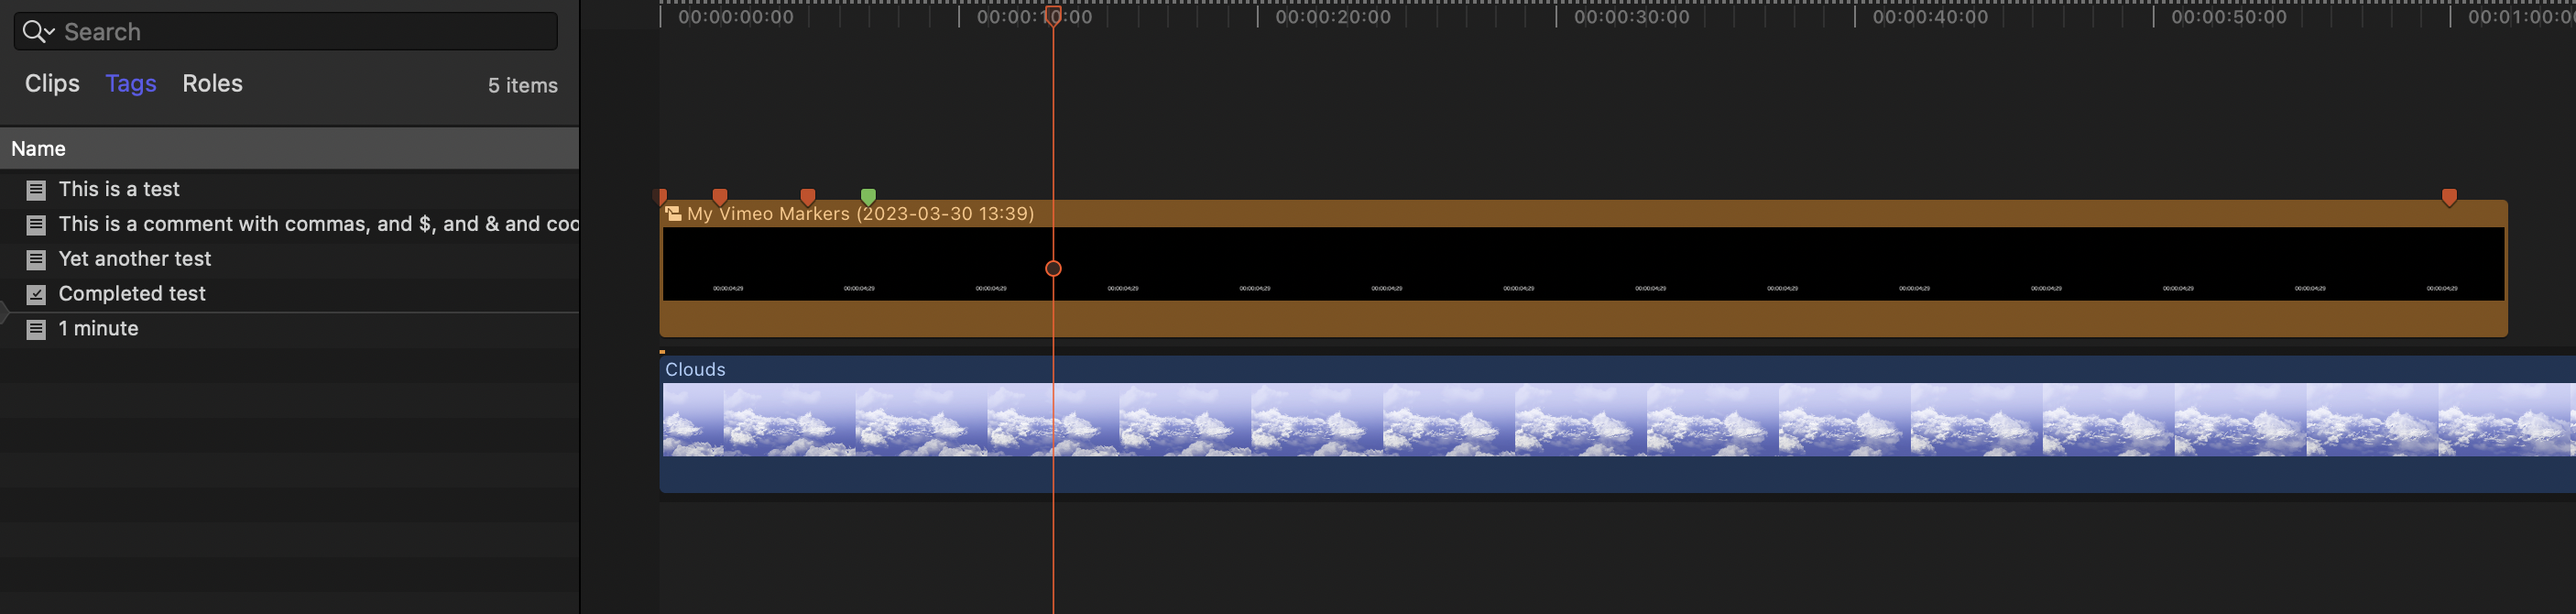
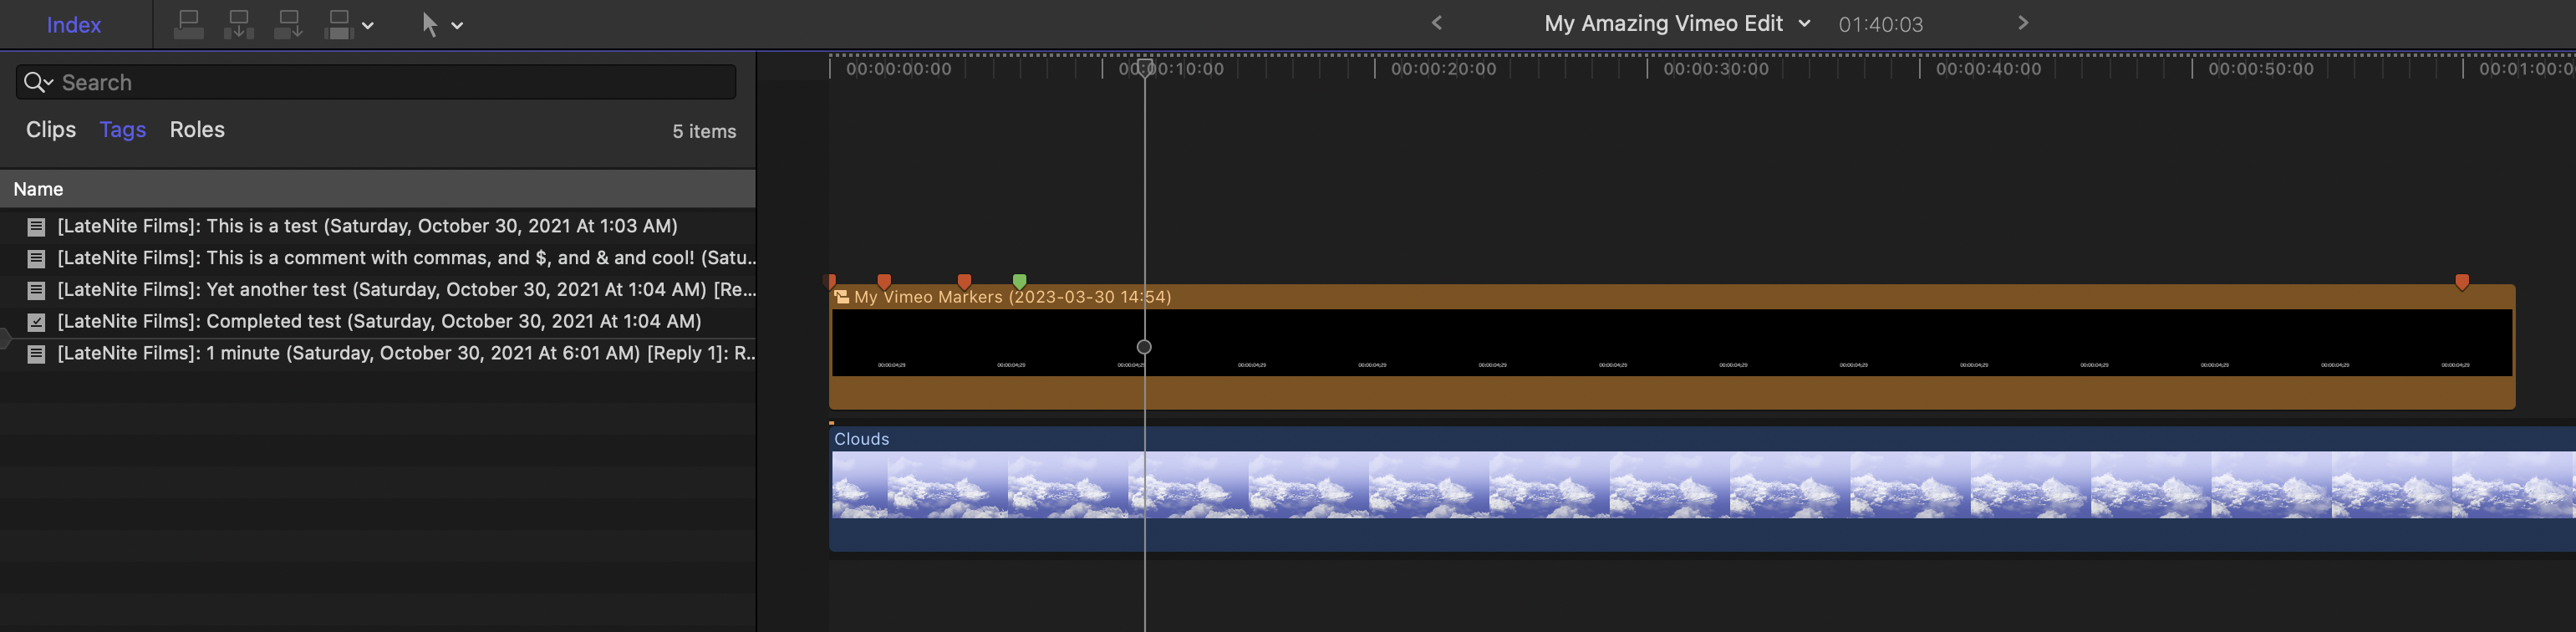
You can then use the Clip > Break Apart Clip Items menubar item to break the Compound Clip into individual markers:
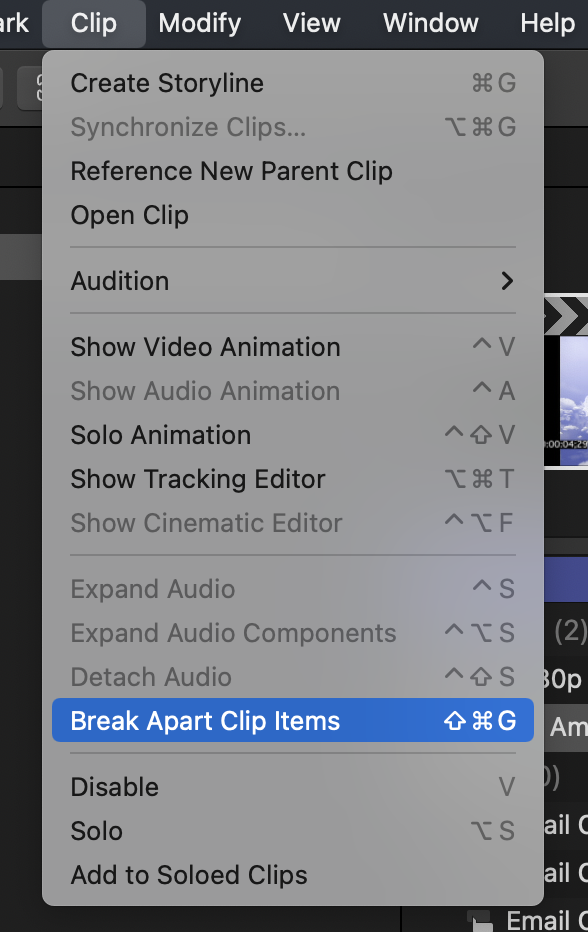
This is handy because the individual markers will now be attached to the clips on the Primary Storyline, so that when you re-arrange clips, those markers will travel with them.
Back in the Workflow Extension if you click the Settings button, you can set the Frame Rate and what information is used for the Marker Name:
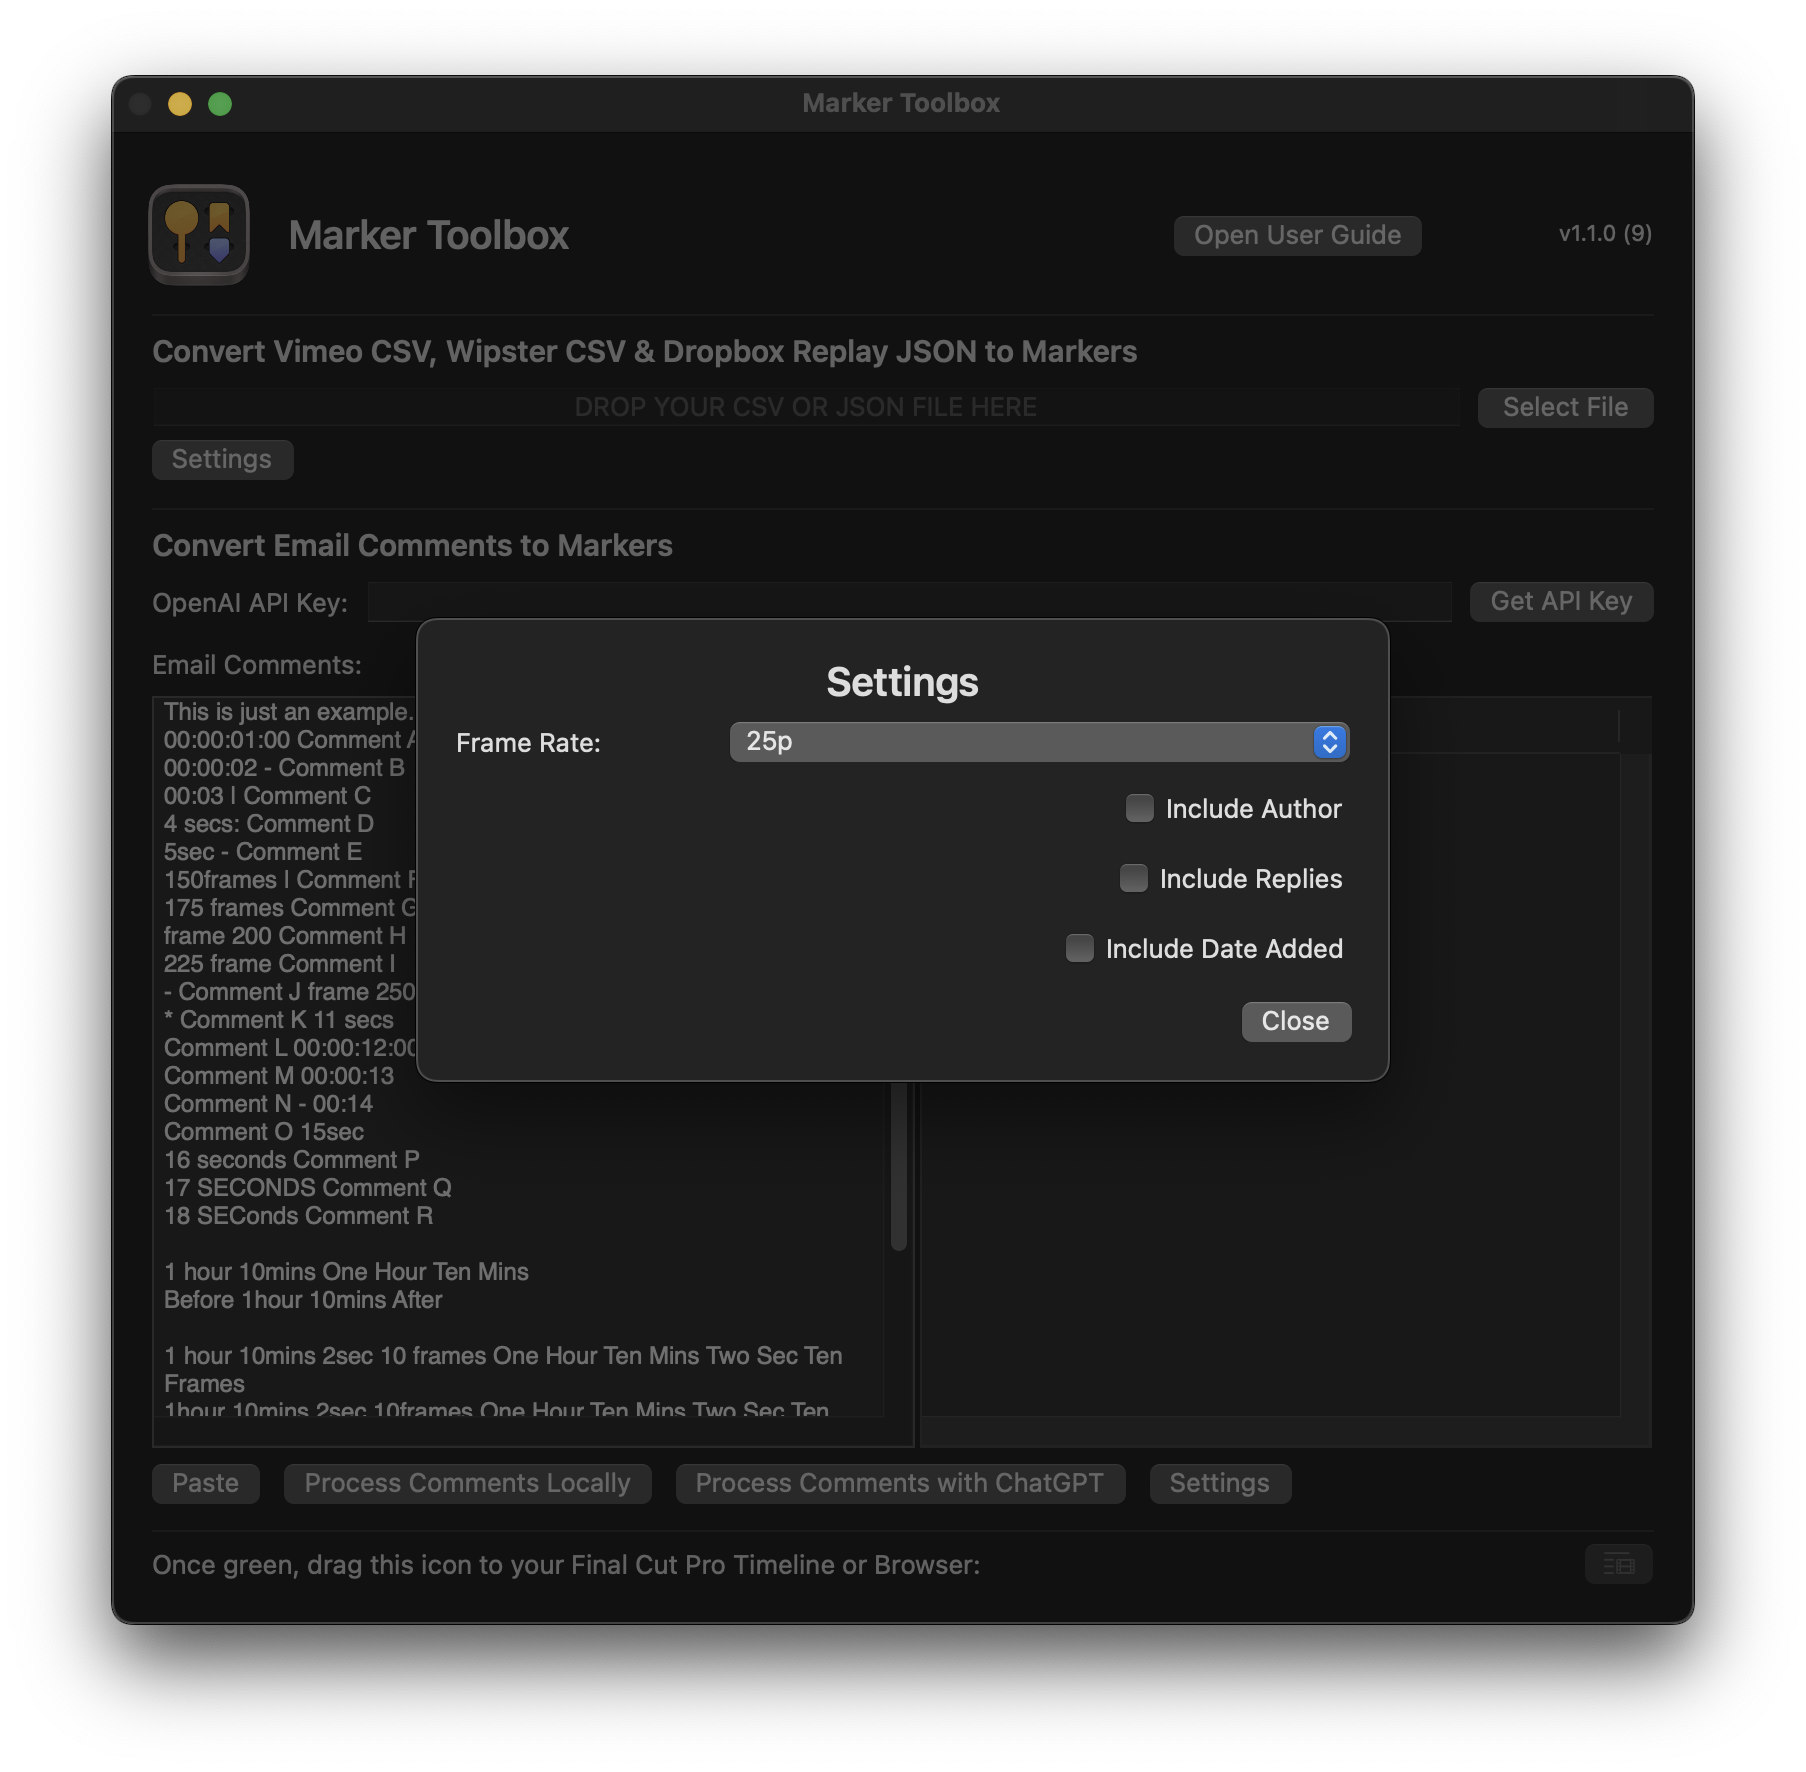
These settings allow you to add the Author, Replies and Date Added to the Marker name within Final Cut Pro, and the Timeline Index:
These settings should be applied before you import a JSON. If you change them, you should import your JSON again for the FCPXML to be updated.
#
Convert Frame.io FIOJSON to Markers
This feature allows you to easily import Frame.io FIOJSON files as markers and titles in Final Cut Pro.
Drawn annotations in Frame.io also come across to Final Cut Pro:
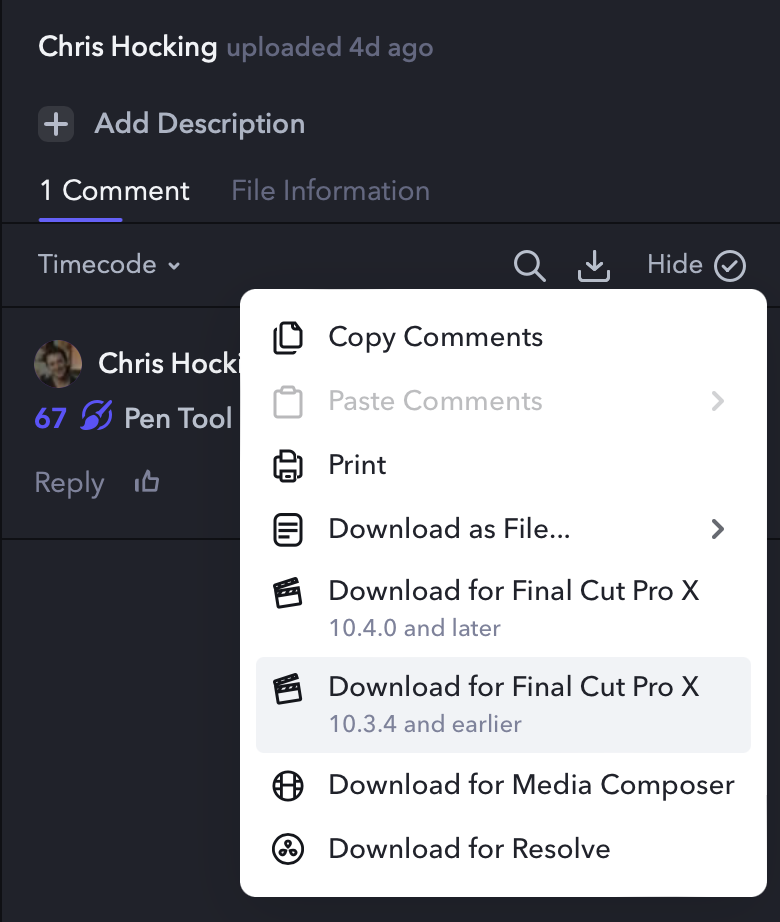
You can export a Frame.io FIOJSON file by clicking the Download button, then selecting Download for Final Cut Pro X 10.4.0 and later:
Once exported, simply drag the FIOJSON file into the drop zone, or click the Select File button:
Assuming the FIOJSON is correct and valid, the draggable icon on the bottom of the interface will now be green:
You can now drag this green icon into your Final Cut Pro timeline or browser.
Alternatively, you can also click the Save File button, and export a:
- Final Cut Pro
FCPXML - Resolve
EDL - Avid Media Composer Marker Text.
If you drag the icon to your timeline, a Compound Clip with all your markers will be added:
You can then use the Clip > Break Apart Clip Items menubar item to break the Compound Clip into individual markers:
This is handy because the individual markers will now be attached to the clips on the Primary Storyline, so that when you re-arrange clips, those markers will travel with them.
Back in the Workflow Extension if you click the Settings button, you can set the Frame Rate and what information is used for the Marker Name:
These settings allow you to add the Author, Replies and Date Added to the Marker name within Final Cut Pro, and the Timeline Index:
These settings should be applied before you import a FIOJSON. If you change them, you should import your FIOJSON again for the FCPXML to be updated.
#
Convert Vimeo CSV to Markers
This feature allows you to easily import Vimeo CSV as markers and titles in Final Cut Pro.
You can learn more about exporting CSV files from Vimeo here.
This functionality has been built into CommandPost for a while, however we've improved upon it based on user feedback.
Once exported, simply drag a CSV file into the drop zone, or click the Select File button:
Assuming the CSV is correct and valid, the draggable icon on the bottom of the interface will now be green:
You can now drag this green icon into your Final Cut Pro timeline or browser.
Alternatively, you can also click the Save File button, and export a:
- Final Cut Pro
FCPXML - Resolve
EDL - Avid Media Composer Marker Text.
If you drag the icon to your timeline, a Compound Clip with all your markers will be added:
You can then use the Clip > Break Apart Clip Items menubar item to break the Compound Clip into individual markers:
This is handy because the individual markers will now be attached to the clips on the Primary Storyline, so that when you re-arrange clips, those markers will travel with them.
Back in the Workflow Extension if you click the Settings button, you can set the Frame Rate and what information is used for the Marker Name:
These settings allow you to add the Author, Replies and Date Added to the Marker name within Final Cut Pro, and the Timeline Index:
These settings should be applied before you import a CSV. If you change them, you should import your CSV again for the FCPXML to be updated.
#
Convert Wipster CSV to Markers
This feature allows you to easily import a Wipster CSV as markers and titles in Final Cut Pro.
You can export a CSV from Wipster, by clicking the Download button on your video, then the Export CSV option.
You can learn more about exporting CSV files from Wipster here.
Once exported, simply drag a CSV file into the drop zone, or click the Select File button:
Assuming the CSV is correct and valid, the draggable icon on the bottom of the interface will now be green:
You can now drag this green icon into your Final Cut Pro timeline or browser.
Alternatively, you can also click the Save File button, and export a:
- Final Cut Pro
FCPXML - Resolve
EDL - Avid Media Composer Marker Text.
If you drag the icon to your timeline, a Compound Clip with all your markers will be added:
You can then use the Clip > Break Apart Clip Items menubar item to break the Compound Clip into individual markers:
This is handy because the individual markers will now be attached to the clips on the Primary Storyline, so that when you re-arrange clips, those markers will travel with them.
Back in the Workflow Extension if you click the Settings button, you can set the Frame Rate and what information is used for the Marker Name:
These settings allow you to add the Author, Replies and Date Added to the Marker name within Final Cut Pro, and the Timeline Index:
These settings should be applied before you import a CSV. If you change them, you should import your CSV again for the FCPXML to be updated.
#
Convert Timecode+ TSV to Markers
This feature allows you to easily import a Timecode+ TSV file as markers and titles in Final Cut Pro.
Simply drag a TSV file into the drop zone, or click the Select File button:
Assuming the TSV is correct and valid, the draggable icon on the bottom of the interface will now be green:
You can now drag this green icon into your Final Cut Pro timeline or browser.
Alternatively, you can also click the Save File button, and export a:
- Final Cut Pro
FCPXML - Resolve
EDL - Avid Media Composer Marker Text.
If you drag the icon to your timeline, a Compound Clip with all your markers will be added:
You can then use the Clip > Break Apart Clip Items menubar item to break the Compound Clip into individual markers:
This is handy because the individual markers will now be attached to the clips on the Primary Storyline, so that when you re-arrange clips, those markers will travel with them.
Back in the Workflow Extension if you click the Settings button, you can set the Frame Rate and what information is used for the Marker Name:
These settings allow you to add the Author, Replies and Date Added to the Marker name within Final Cut Pro, and the Timeline Index:
These settings should be applied before you import a TSV. If you change them, you should import your TSV again for the FCPXML to be updated.
#
Convert Text Comments to Markers
This feature allows you to easily convert random text comments into Markers.
This is handy if your client refuses to use Vimeo Review, Dropbox Replay or Frame.io, and sends email comments or text messages instead.
If the feedback is well organised, then you can use the Process Comments Locally button to easily translate any time values into timecode.
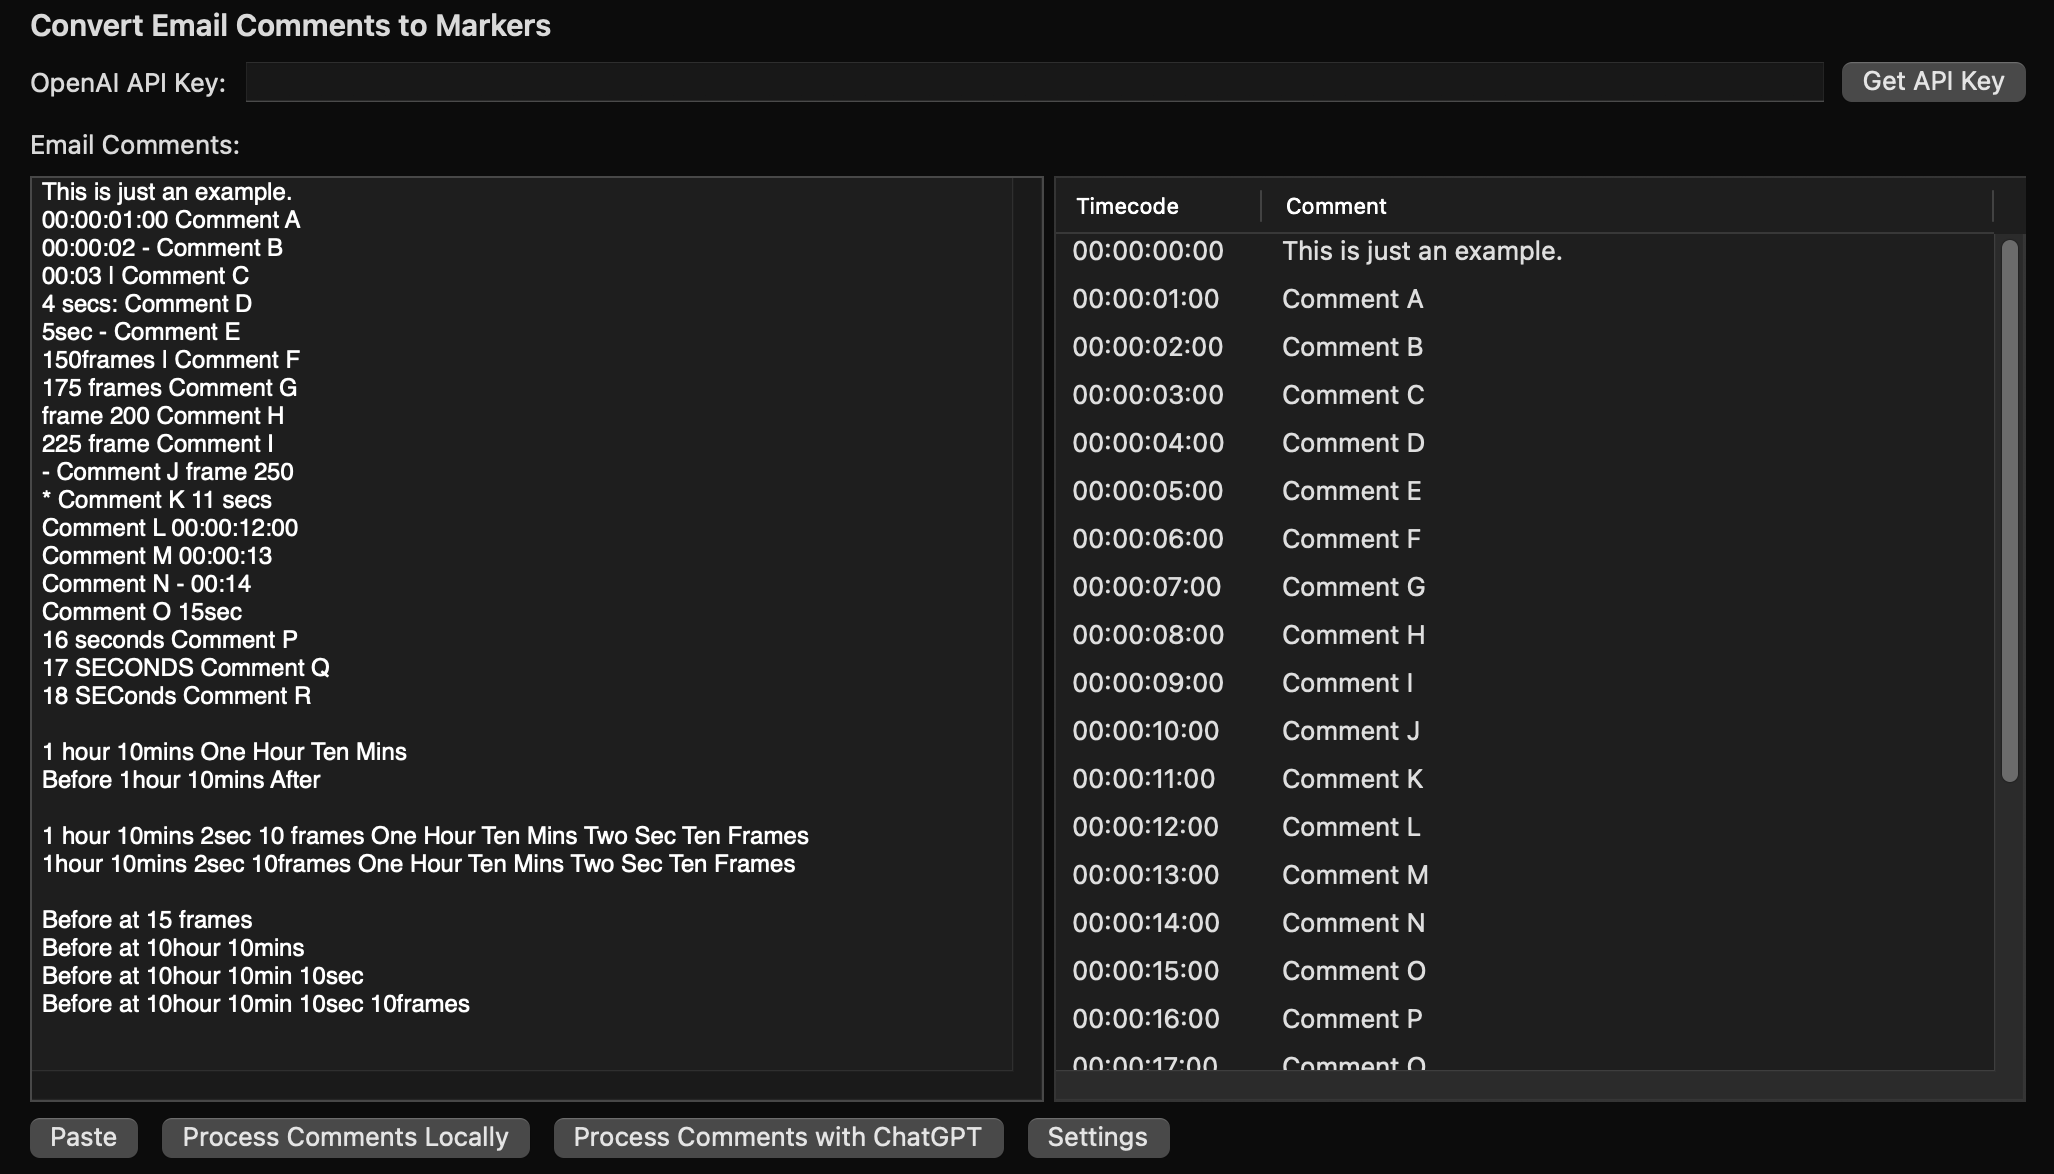
This process uses a very simple algorithm that supports time formats like:
hh:mm:ss:ff - Comment
mm:ss:ff - Comment
1 hour - Comment
1 hour 10mins 30secs 10frames - Comment
I really like the shot at 250 frames
Please remove the shot at 10 minutes
However, if you have a more complicated collection of feedback, you can use OpenAI's ChatGPT to process it. For example:

To use the ChatGPT functionality you'll need to supply your own OpenAI API key..
You can set up a OpenAI account for free, and you'll get a limited number of tokens. You can find OpenAI's pricing here.
If you have a ChatGPT account, you can get your API key here.
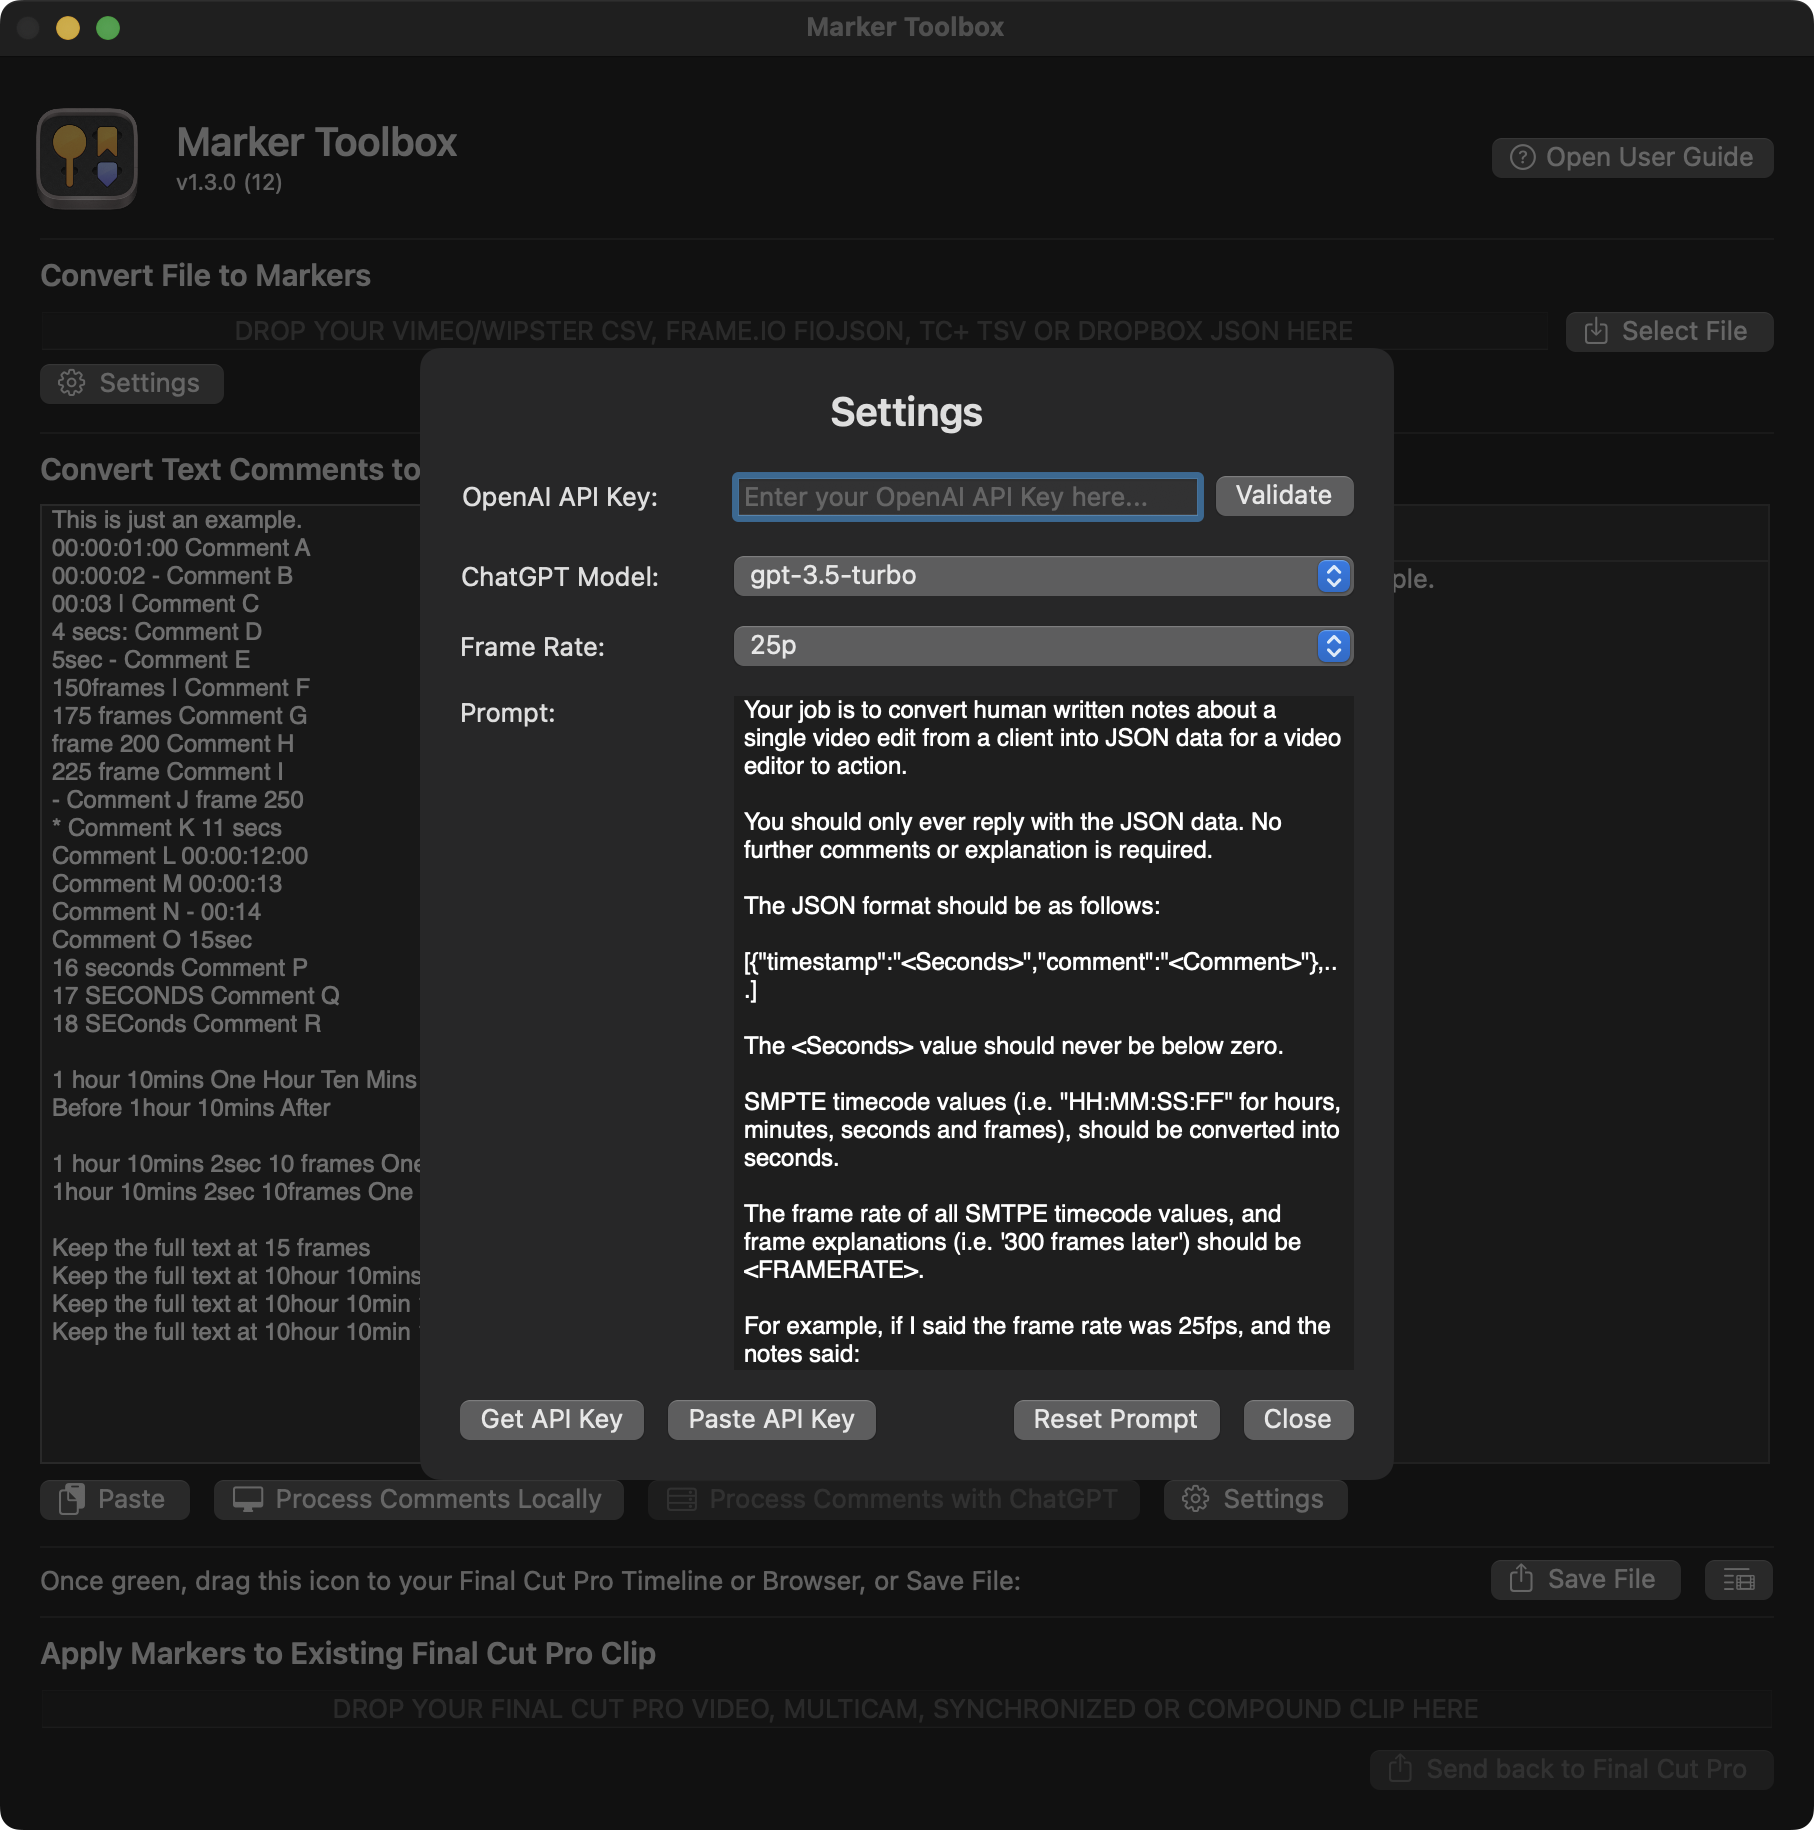
You can enter your OpenAI API Key in the Settings panel:
Pressing the Get API Key button in the user interface, will open up the same above link.
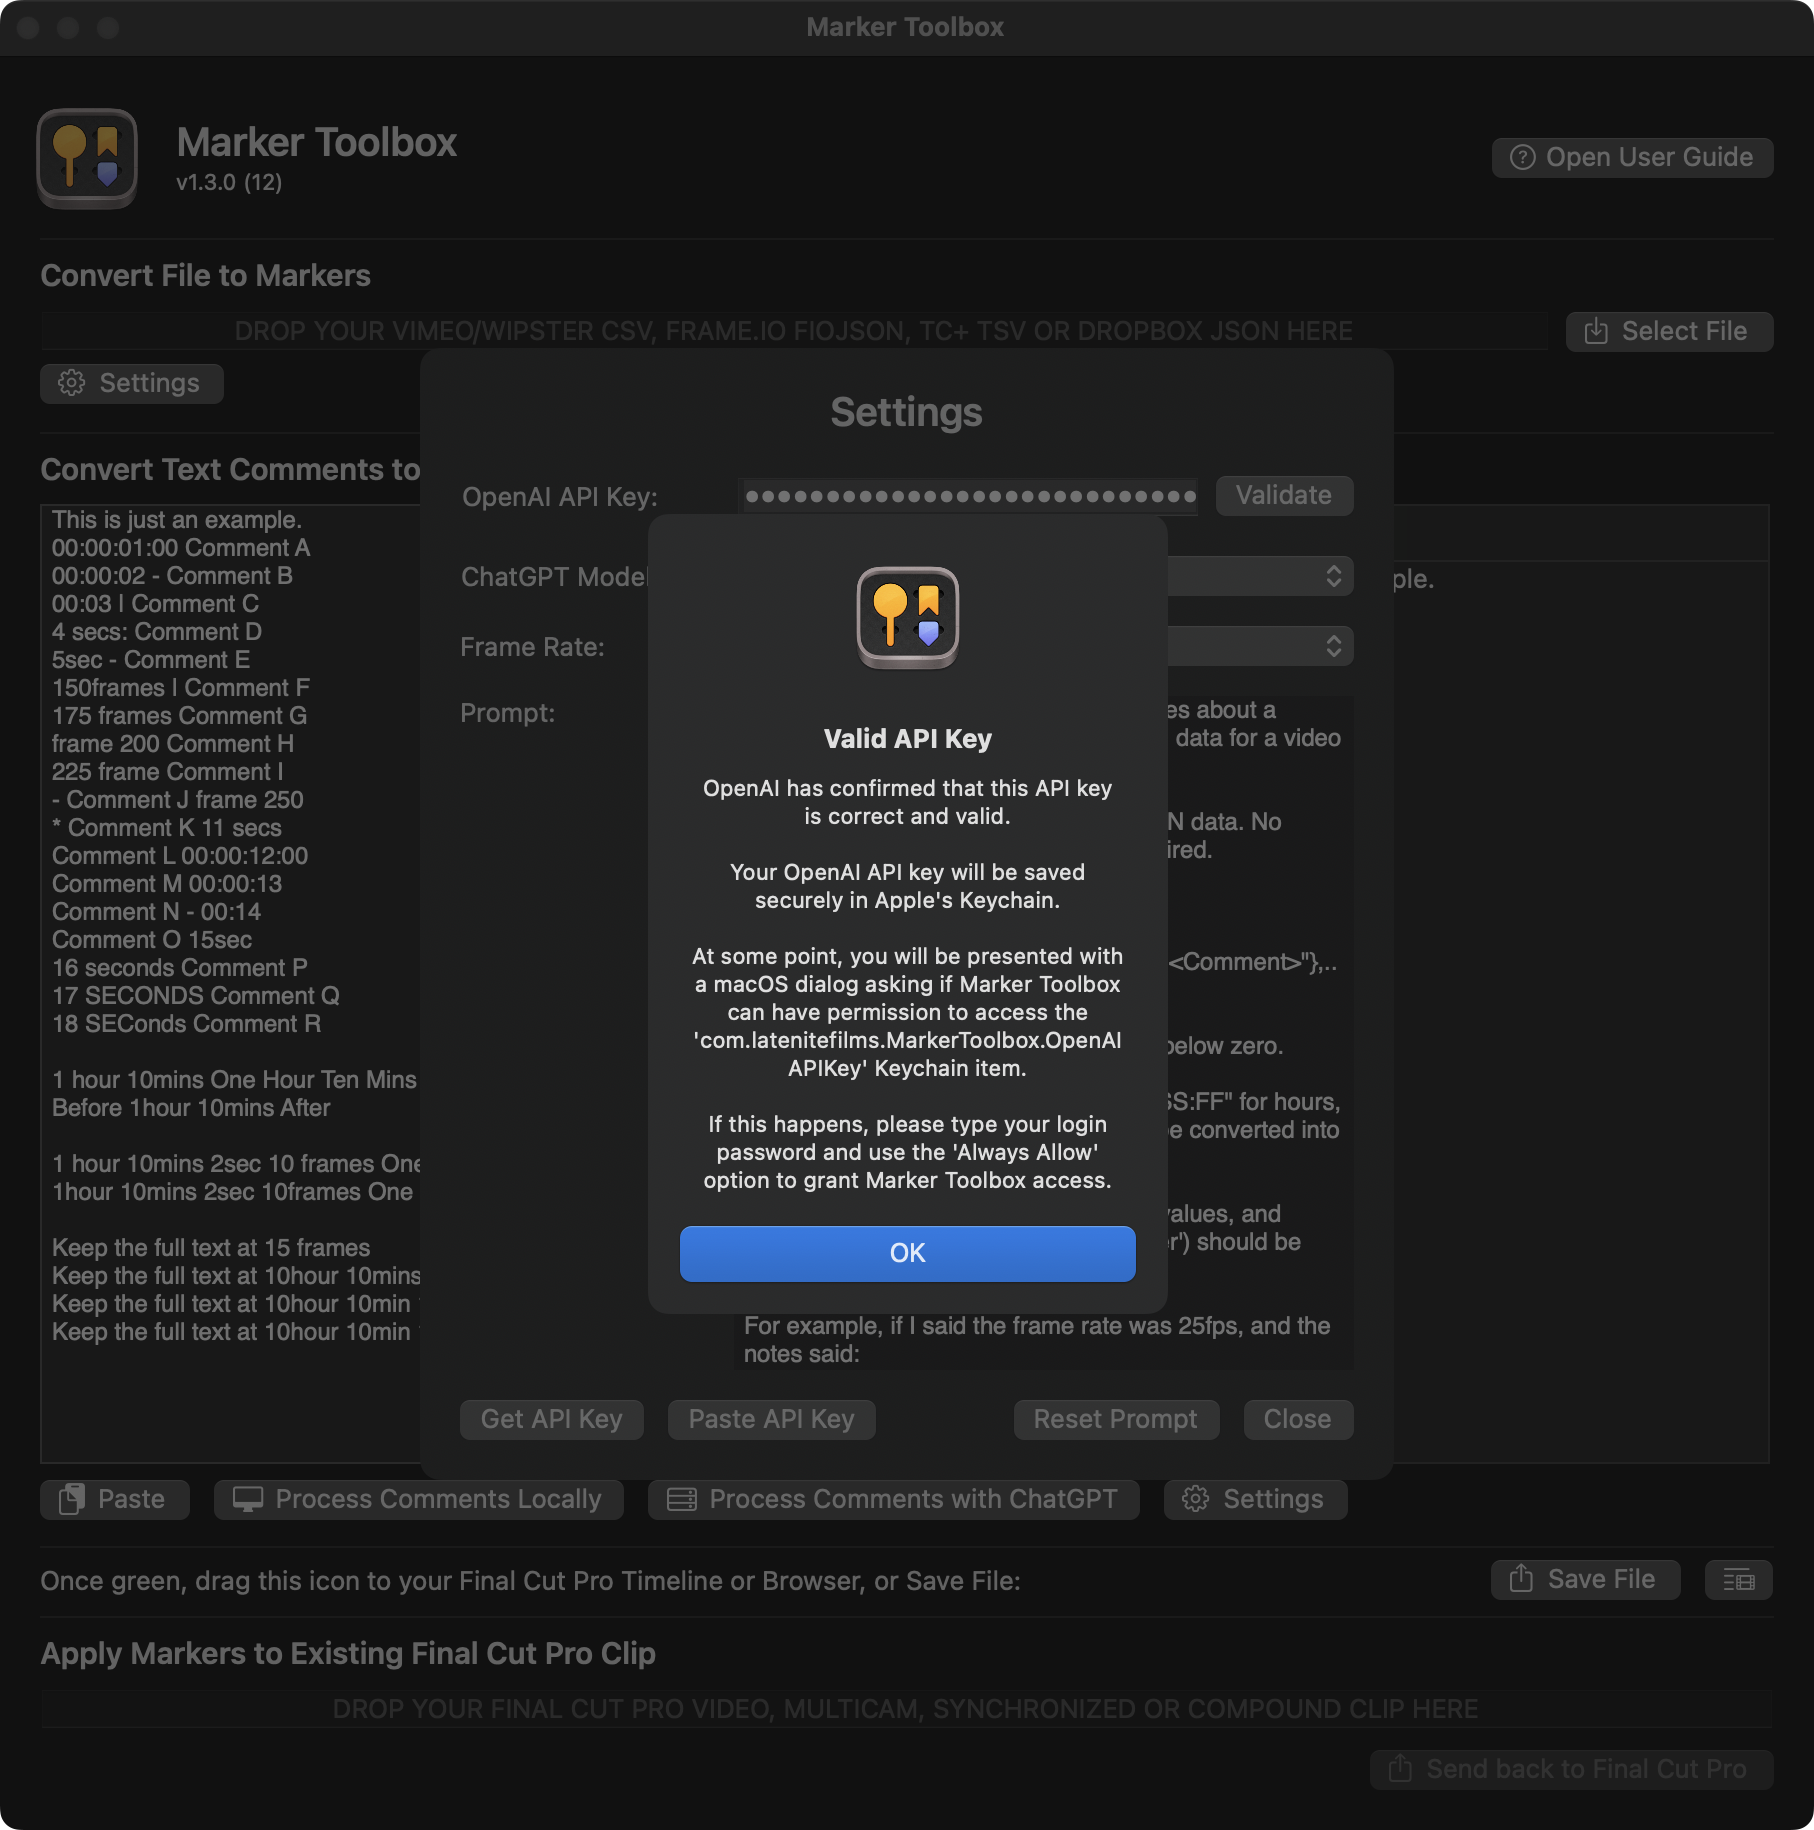
Your API key is securely saved in macOS's Keychain.
If you copy the API key from the OpenAI website, you can use the Paste API Key to paste it.
If the API key is valid, you'll be pressed with this:
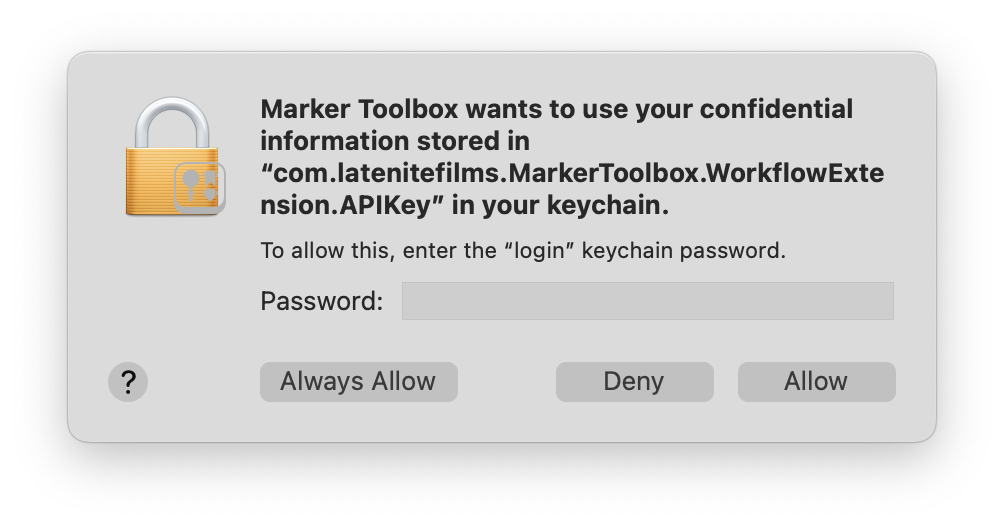
Depending on your security settings, you then may be prompted to enter your macOS password, so that Marker Toolbox can access the API stored in the Marker Toolbox can access the information stored within the com.latenitefilms.MarkerToolbox.OpenAIAPIKey keychain item. Click Always Allow.
You can now use the Process Comments with ChatGPT button within Marker Toolbox to send text comments to ChatGPT.
Depending on OpenAI's server load, this process can happen quickly, or take a few minutes.
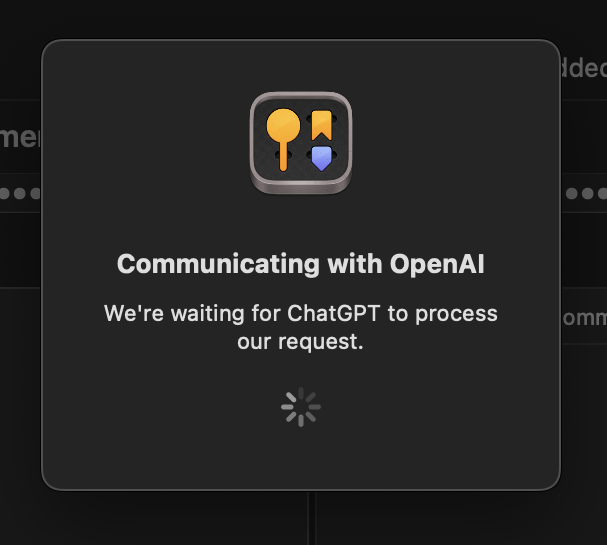
You can check the OpenAI Server Status here.
Once complete, you can now drag the green icon into your Final Cut Pro timeline or browser.
Alternatively, you can also click the Save File button, and export a:
- Final Cut Pro
FCPXML - Resolve
EDL - Avid Media Composer Marker Text.
You can also customise the ChatGPT Model, Frame Rate and Prompt by clicking the Settings button:
The default ChatGPT Model is gpt-3.5-turbo. If you have access to gpt-3.5-turbo-16k, gpt-4 or gpt-4-32k you can also select them.
You can learn more about the various ChatGPT models here.
The Frame Rate dropdown allows you to select the frame rate of your destination timeline/project. It's 25fps by default.
Finally, you can customise the ChatGPT prompt as required.
The default prompt is:
Your job is to convert human written notes about a single video edit from a client into JSON data for a video editor to action.

You should only ever reply with the JSON data. No further comments or explanation is required.

The JSON format should be as follows:

[{\"timestamp\":\"<Seconds>\",\"comment\":\"<Comment>\"},...]

The <Seconds> value should never be below zero.

SMPTE timecode values (i.e. \"HH:MM:SS:FF\" for hours, minutes, seconds and frames), should be converted into seconds.

The frame rate of all SMTPE timecode values, and frame explanations (i.e. '300 frames later') should be <FRAMERATE>.

For example, if I said the frame rate was 25fps, and the notes said:

1sec: I really like this shot
00:00:02 Please remove this shot
1min 23sec Fix this window
5 minute mark - Remove the cat
at ten minutes - Replace this shot
on frame 1 add a sound effect here
* i really like the shot at 6 seconds
* something really cool happens 10 seconds later
- insert monkey at 12 frames

Your reply should be:

[
{\"timestamp\":\"1\", \"comment\":\"I really like this shot\"},
{\"timestamp\":\"2\", \"comment\":\"Please remove this shot\"},
{\"timestamp\":\"83\", \"comment\":\"Fix this window\"},
{\"timestamp\":\"300\", \"comment\":\"Remove the cat\"},
{\"timestamp\":\"600\", \"comment\":\"Replace this shot\"}
{\"timestamp\":\"0.04\", \"comment\":\"Add a sound effect here\"}
{\"timestamp\":\"6\", \"comment\":\"I really like the shot\"}
{\"timestamp\":\"16\", \"comment\":\"Something really cool happens\"}
{\"timestamp\":\"0.48\", \"comment\":\"Insert monkey\"}
]

Please be careful about whether a timecode value is relative to the previous comment's timecode value (i.e. '10 seconds later') and calculate accordingly.

If there is a general note with no timecode or timing value, please use a 0 second timestamp value.

Please process the below notes:

<COMMENT>
You must include both the <FRAMERATE> and <COMMENT> in the prompt.
Please be aware that ChatGPT can be fairly unpredictable, and each time you press the Process Comments with ChatGPT button you might slightly different results.
#
Apply Markers to Existing Final Cut Pro Clip
To use this feature, follow the same steps as above, but instead of dragging the green icon or clicking the Save File button, drag in a Clip, Multicam Clip, Synchronised Clip or Compound Clip into the drop zone at the bottom of Marker Toolbox.
Once done, the Send back to Final Cut Pro button will be enabled, and when you click it, Marker Toolbox will send back the clip to the select Final Cut Pro library in a new event, with Markers applied to the clip.